Customize Your Blockchain
The first step in launching your own blockchain entails customizing the various parameters that ultimately determine how it will function. The following information details everything you need to know regarding the customization step, namely the following subsections:
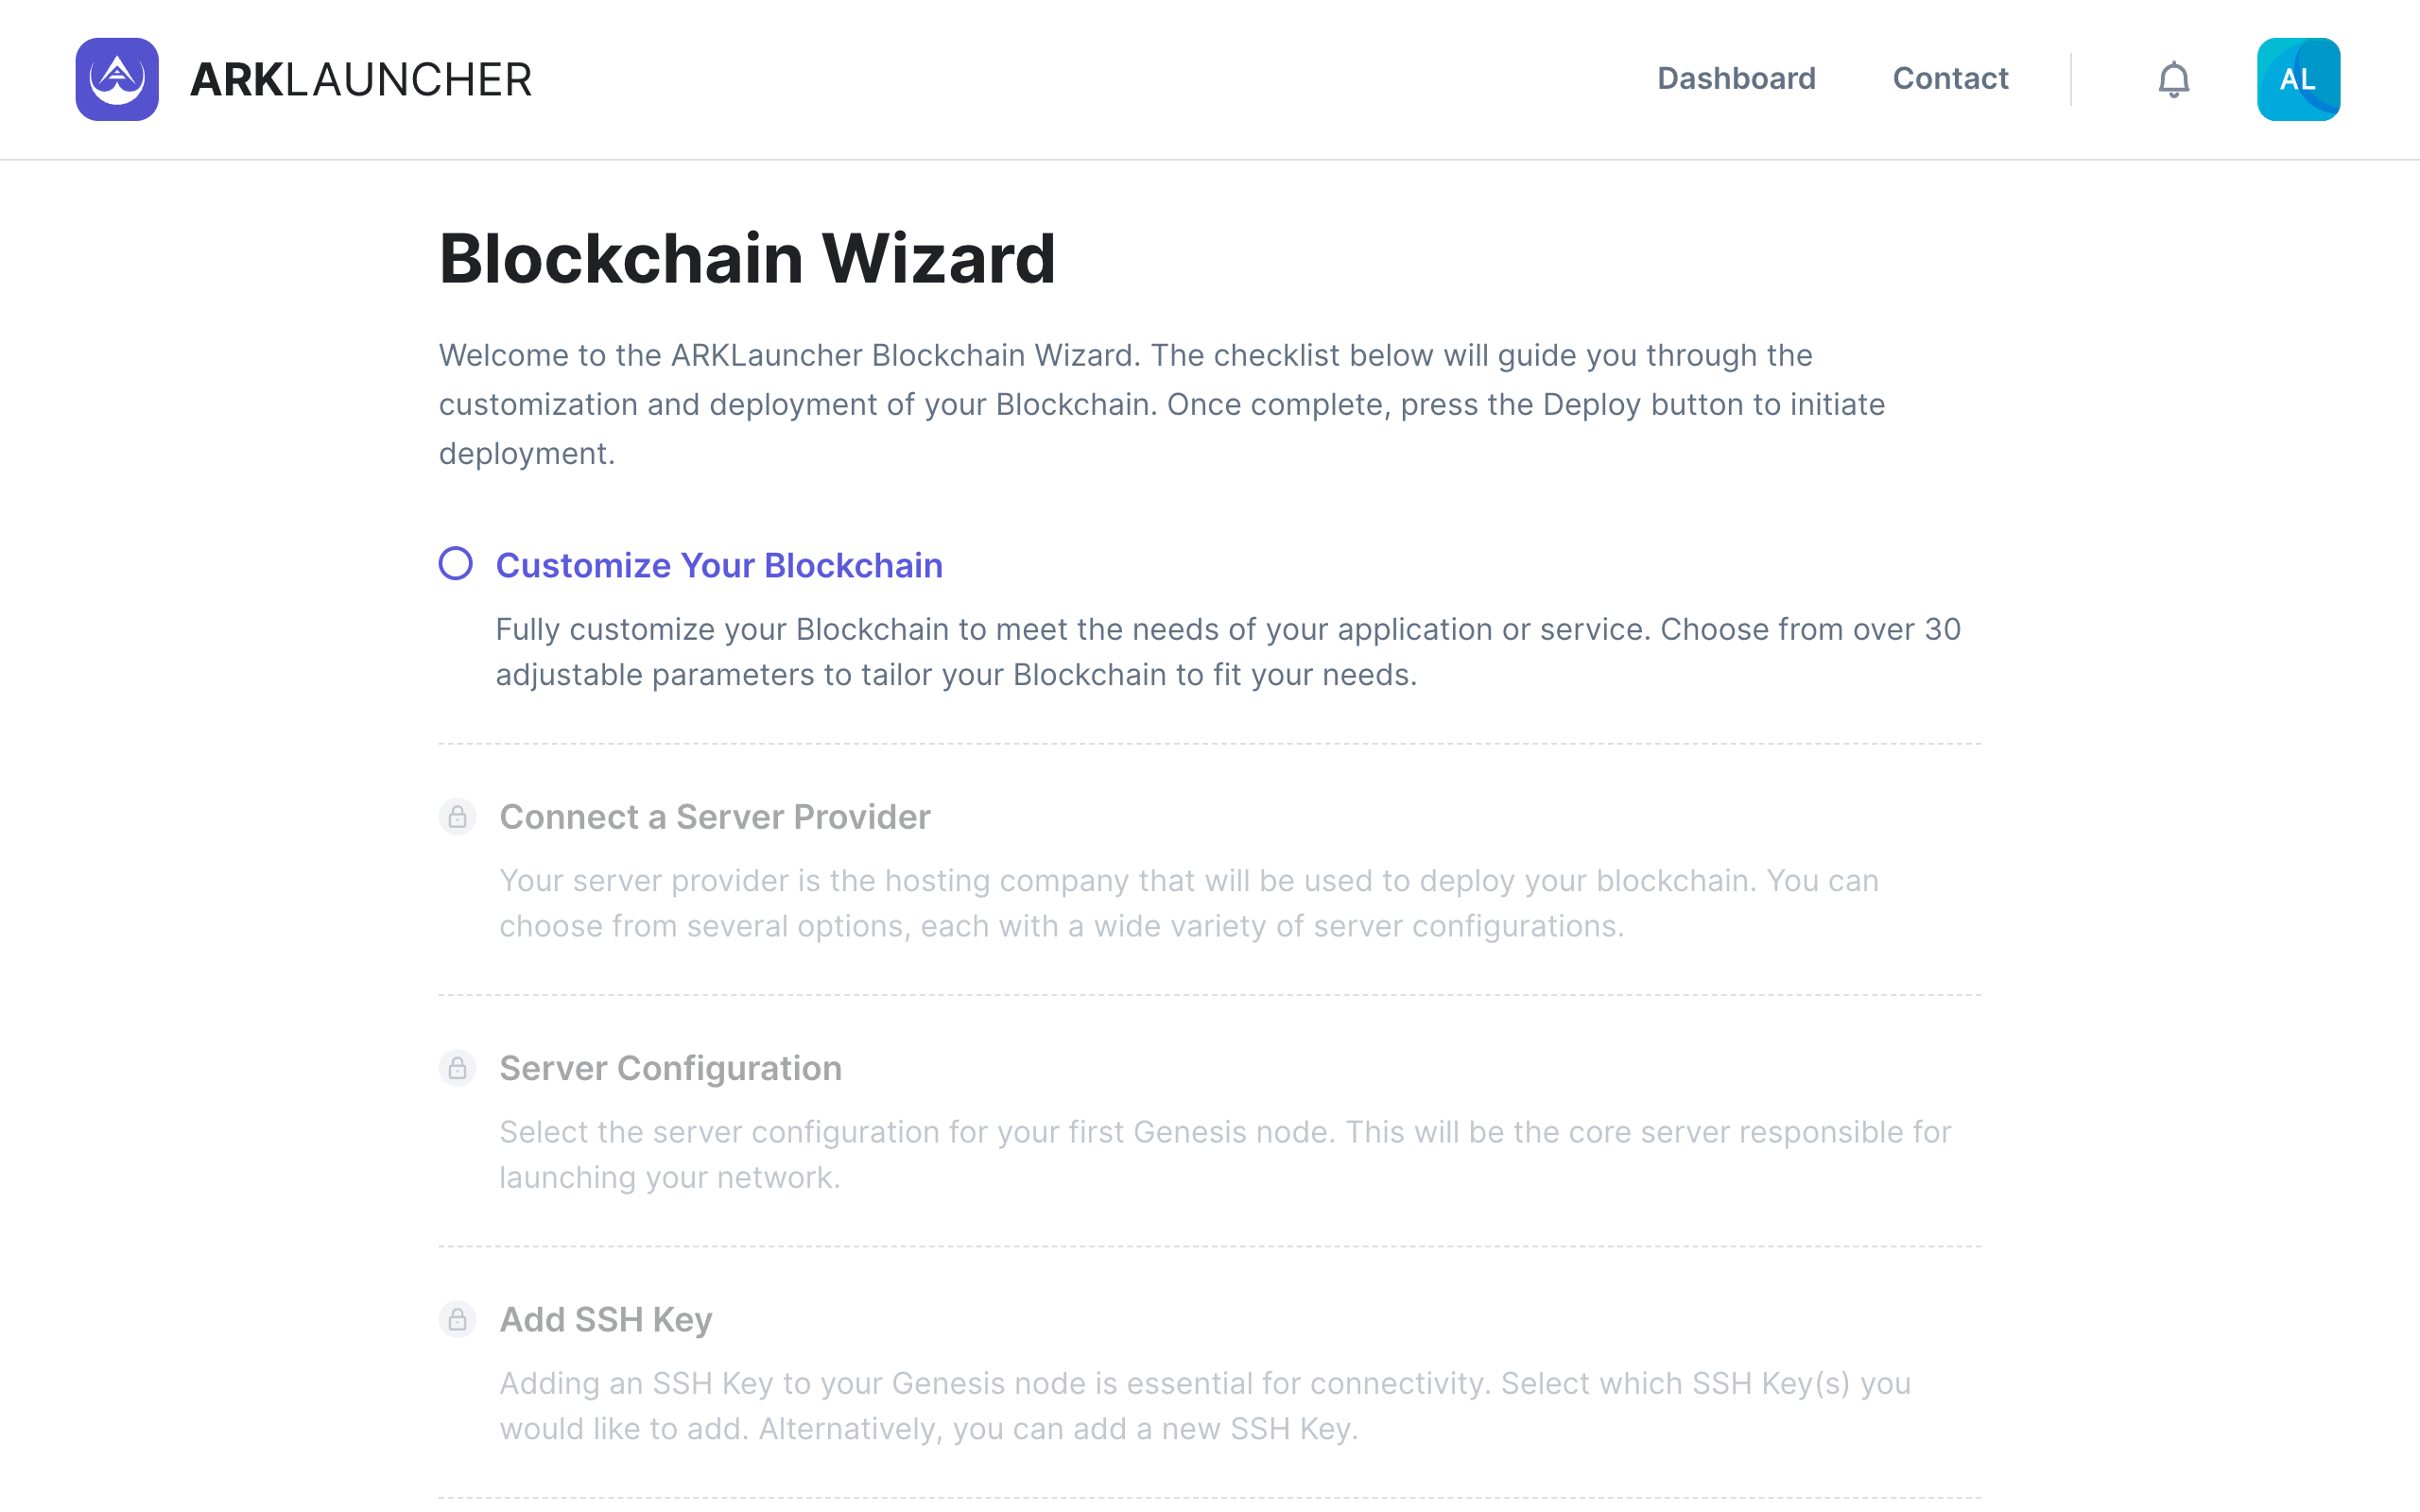
Navigate to ‘General’
While viewing the Blockchain Wizard, click on Customize Your Blockchain to begin the customization process.
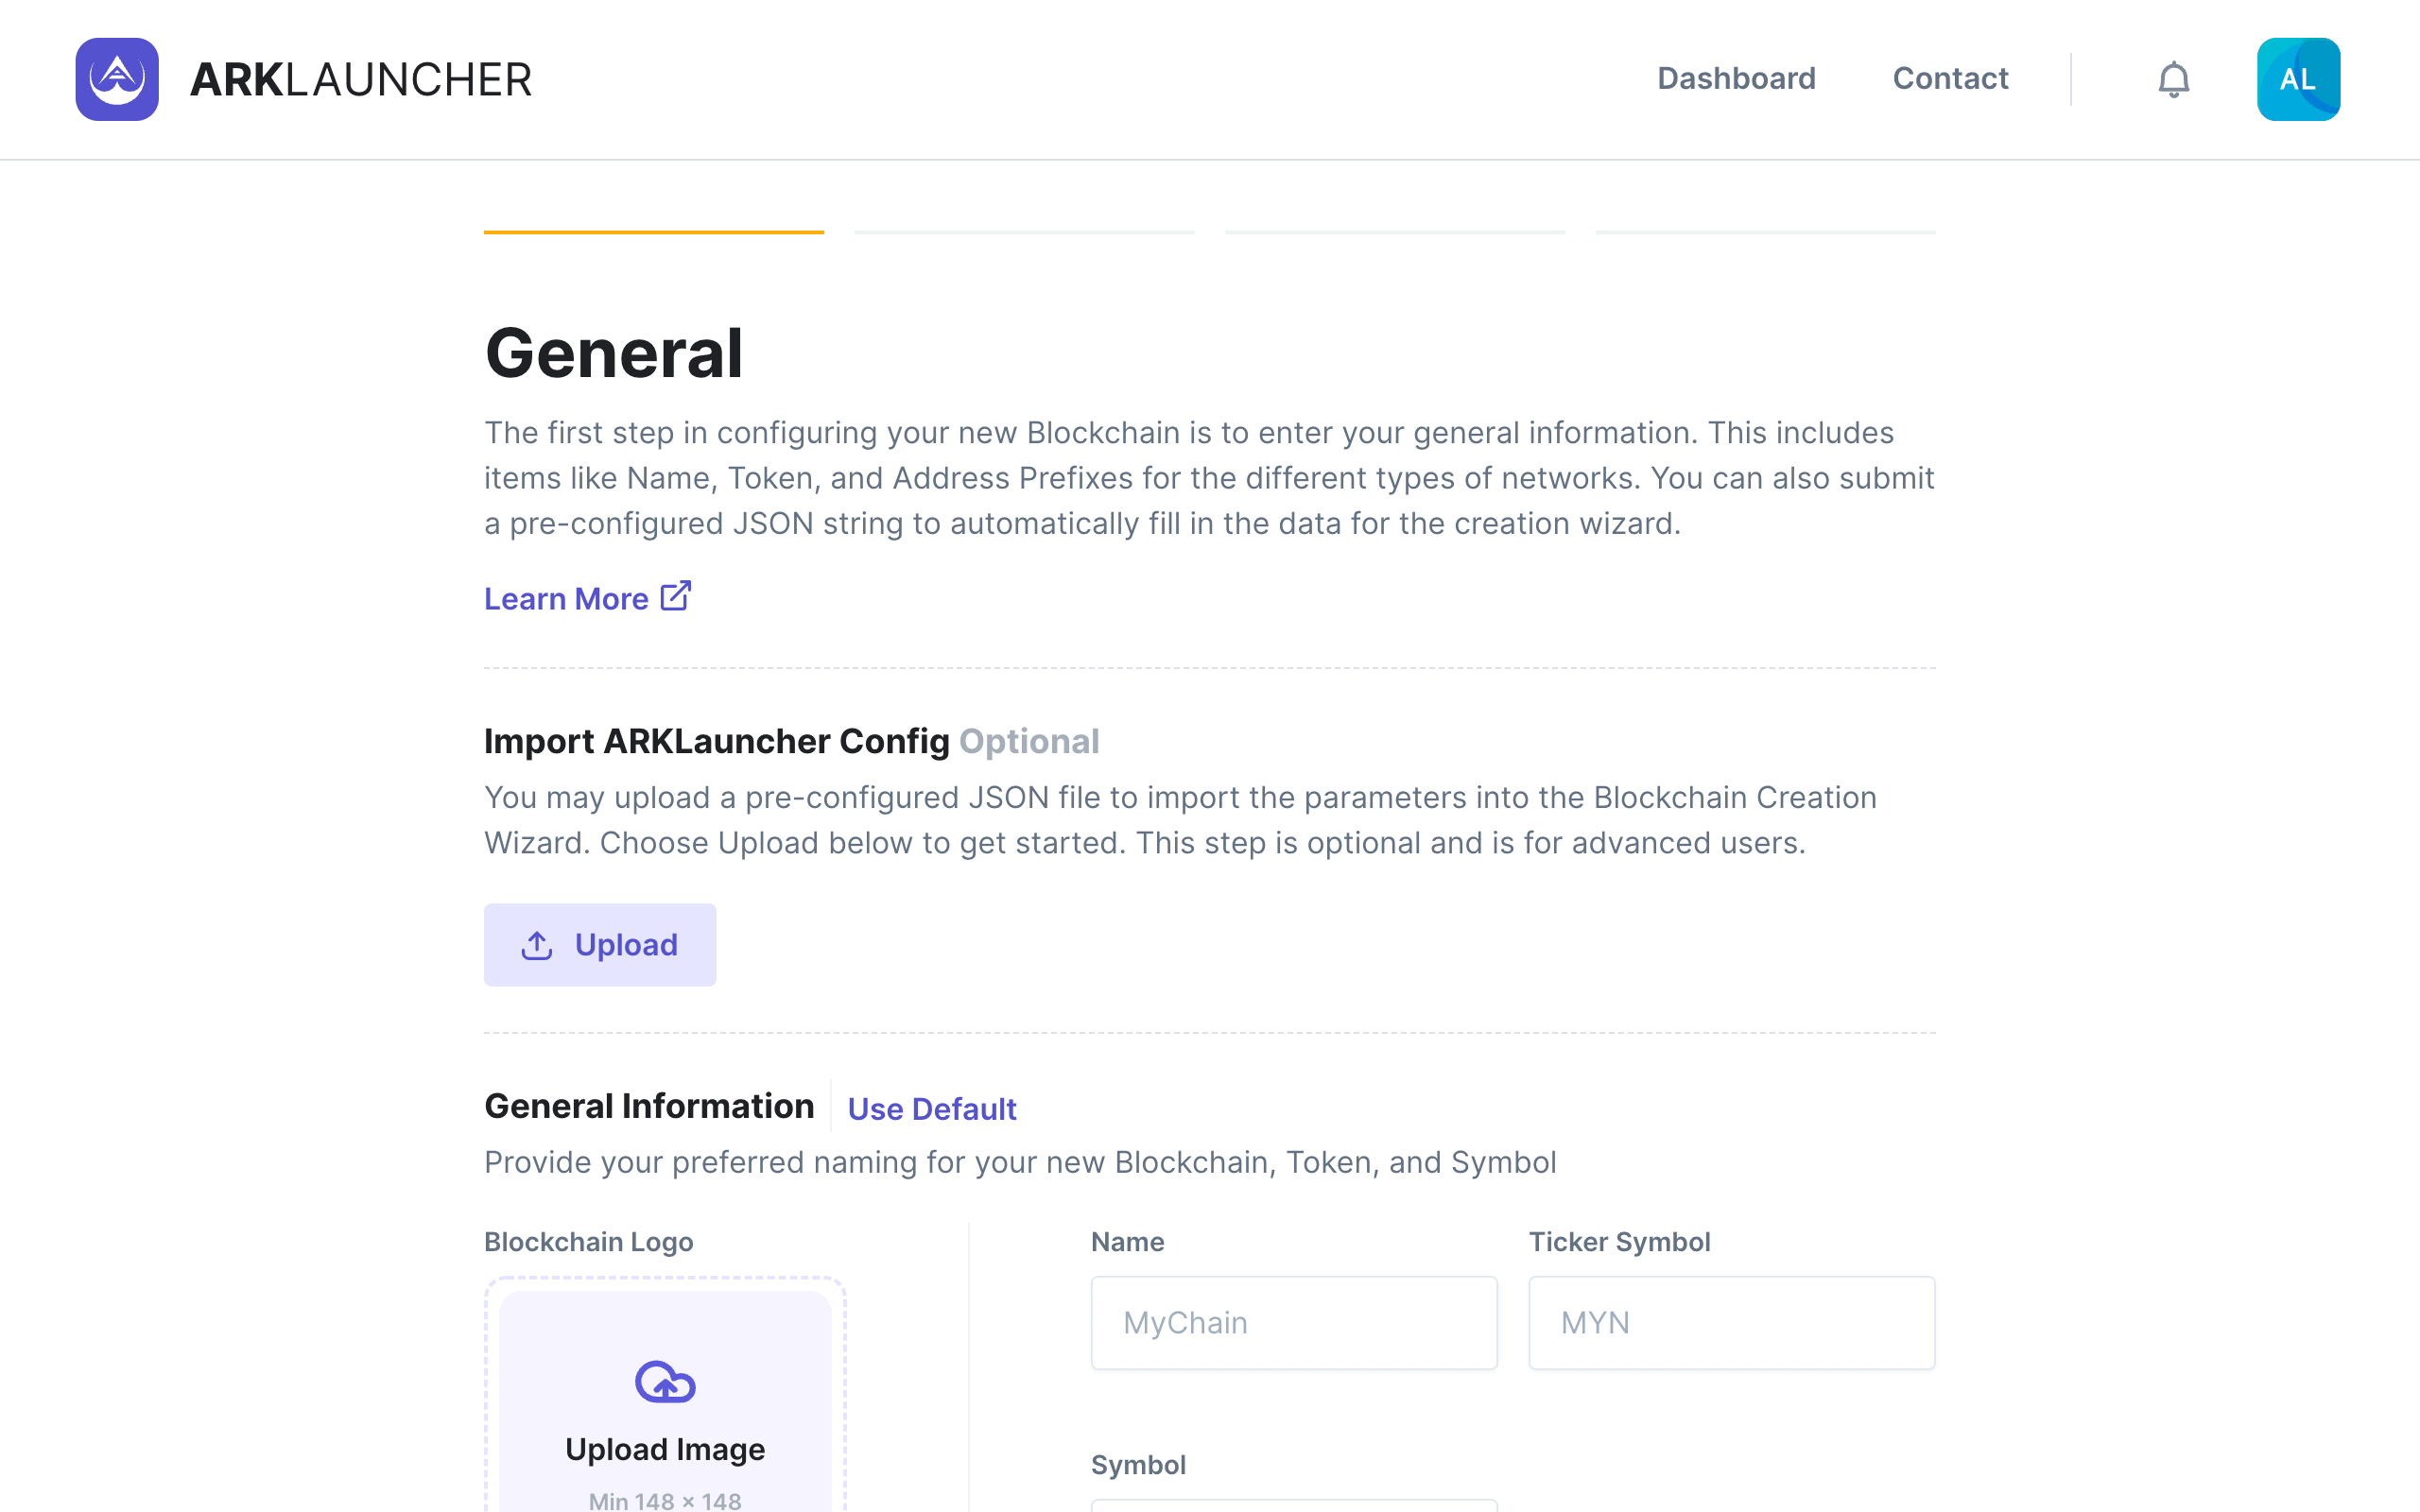
General
To begin the process of customizing your blockchain, you will first need to configure a few parameters on the General page.
Help
Advanced users may choose to upload a pre-configured JSON file into the Blockchain Wizard to streamline the blockchain creation process. Click the Upload button under Import ARKLauncher Config and select your .json file to import your own presets into ARKLauncher.
You will notice that the General page is divided into three sections, namely:
- Import ARKLauncher Config
- General Information, and
- Address Prefixes
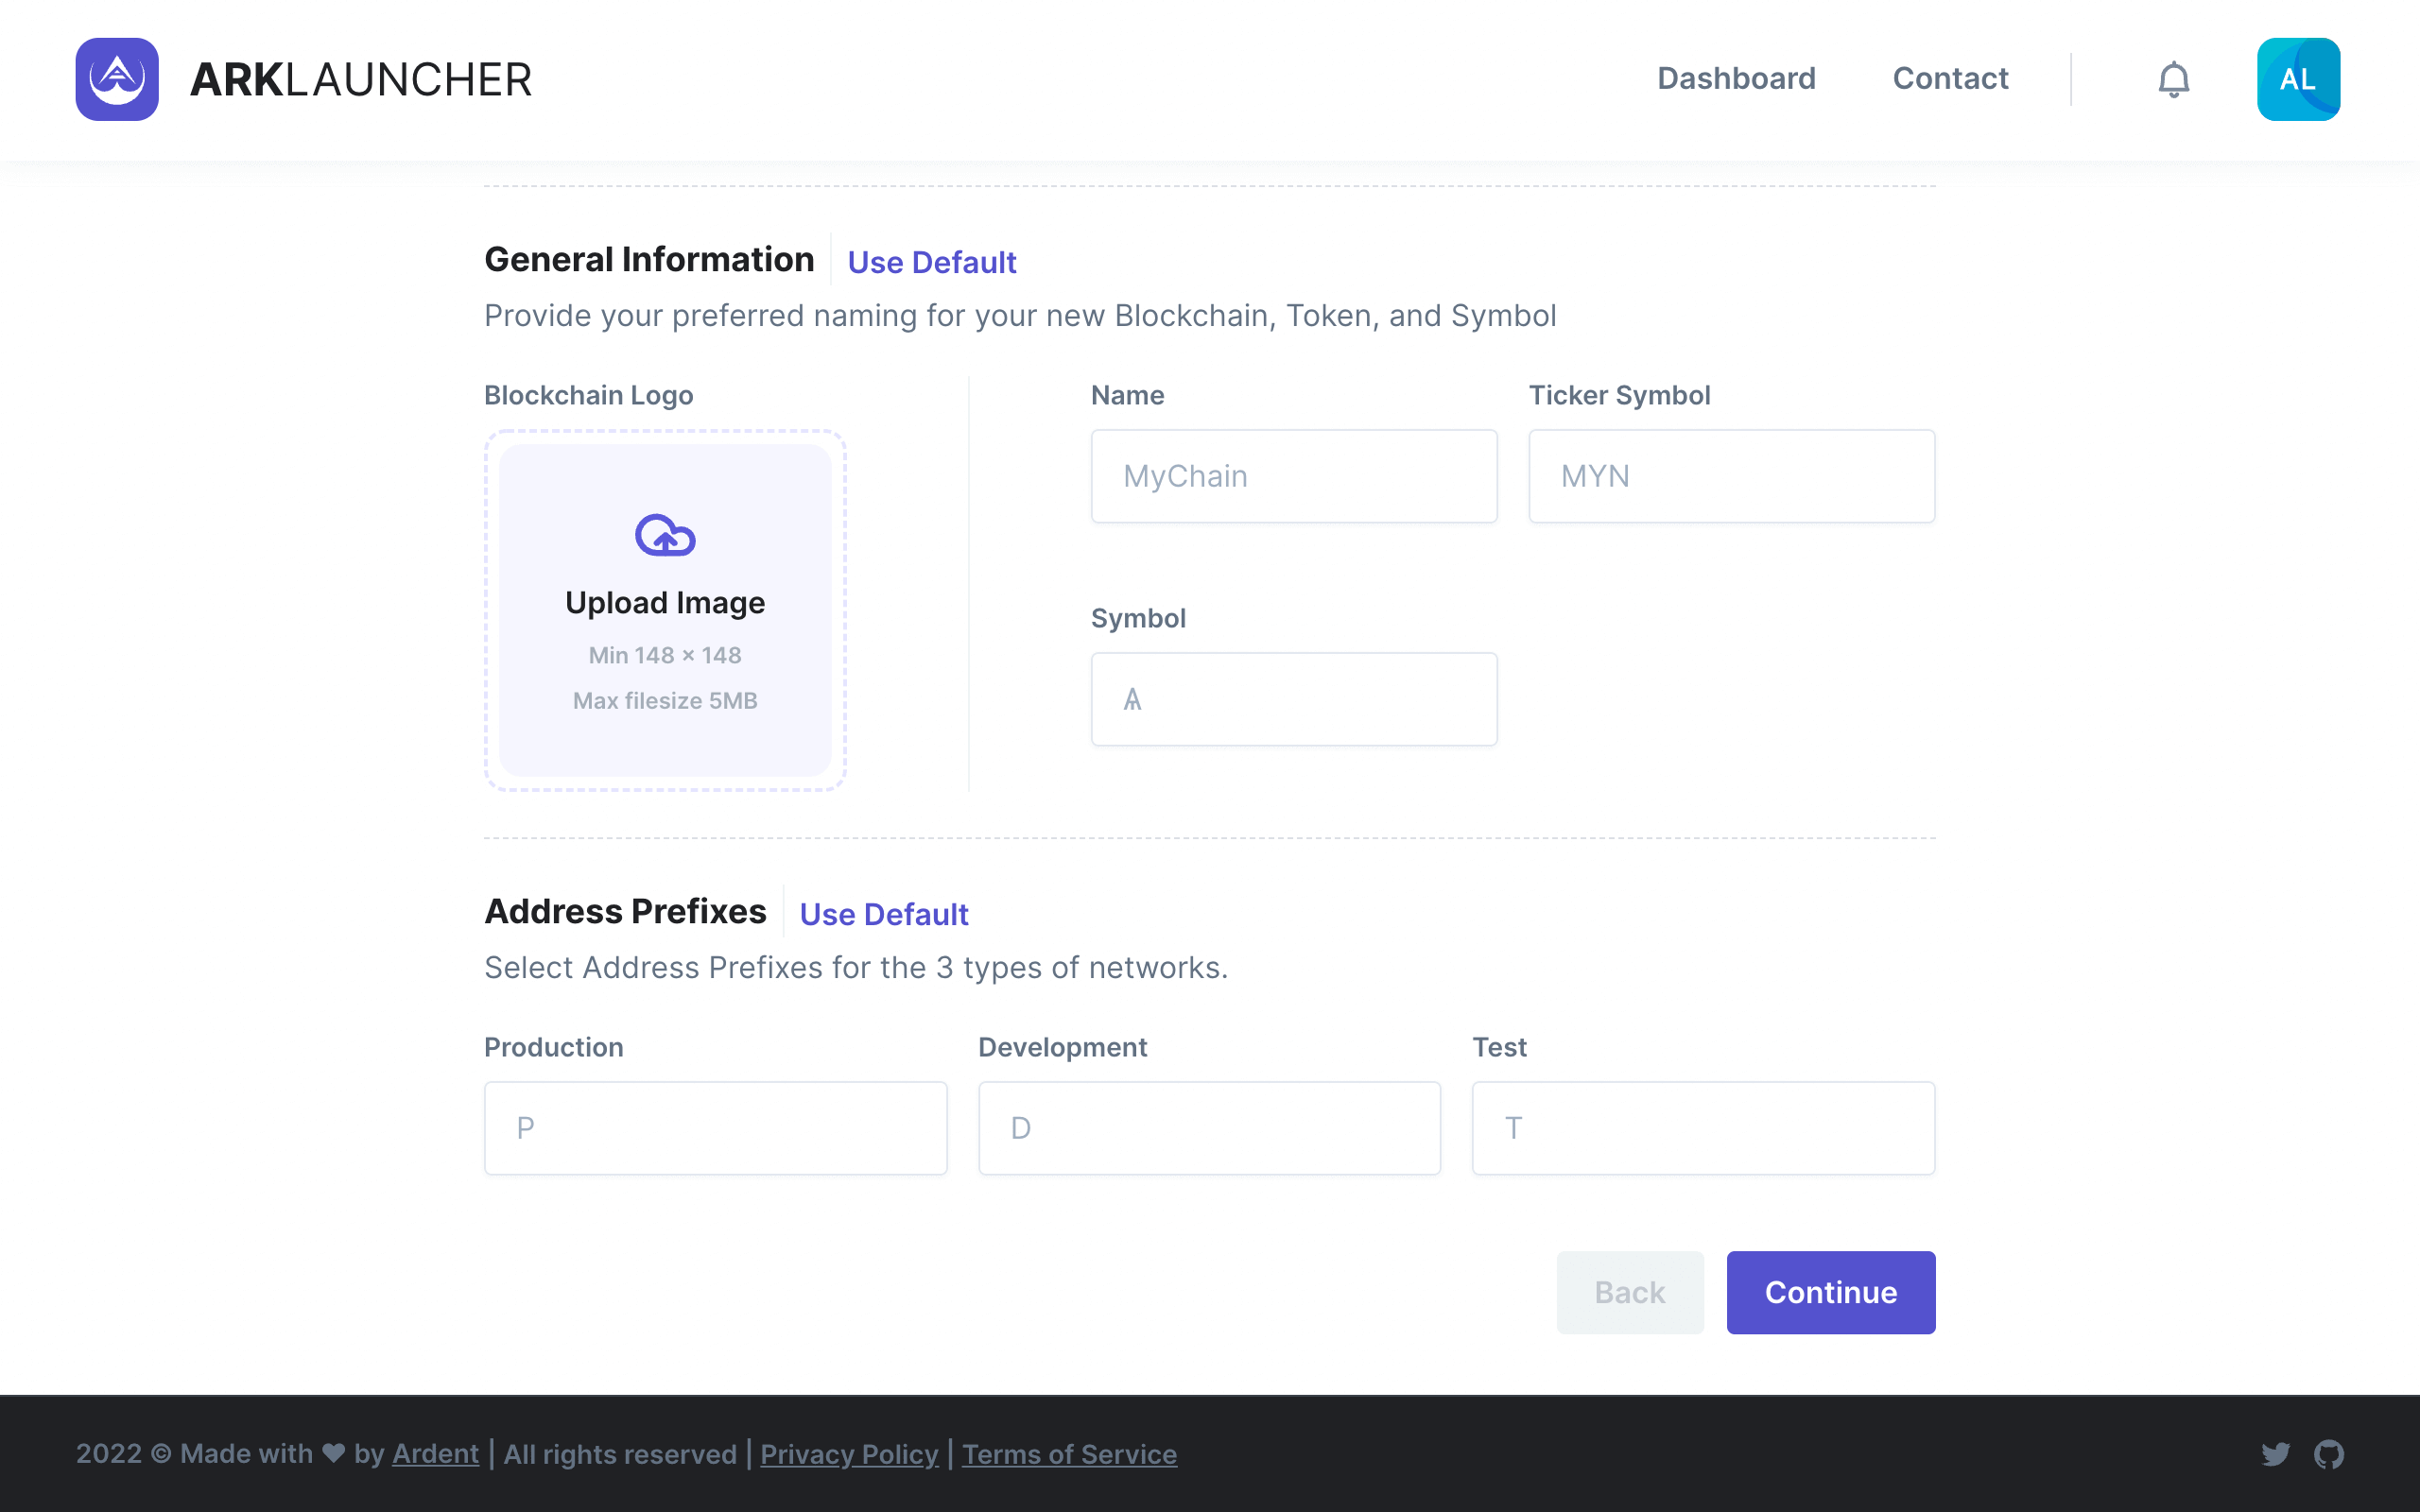
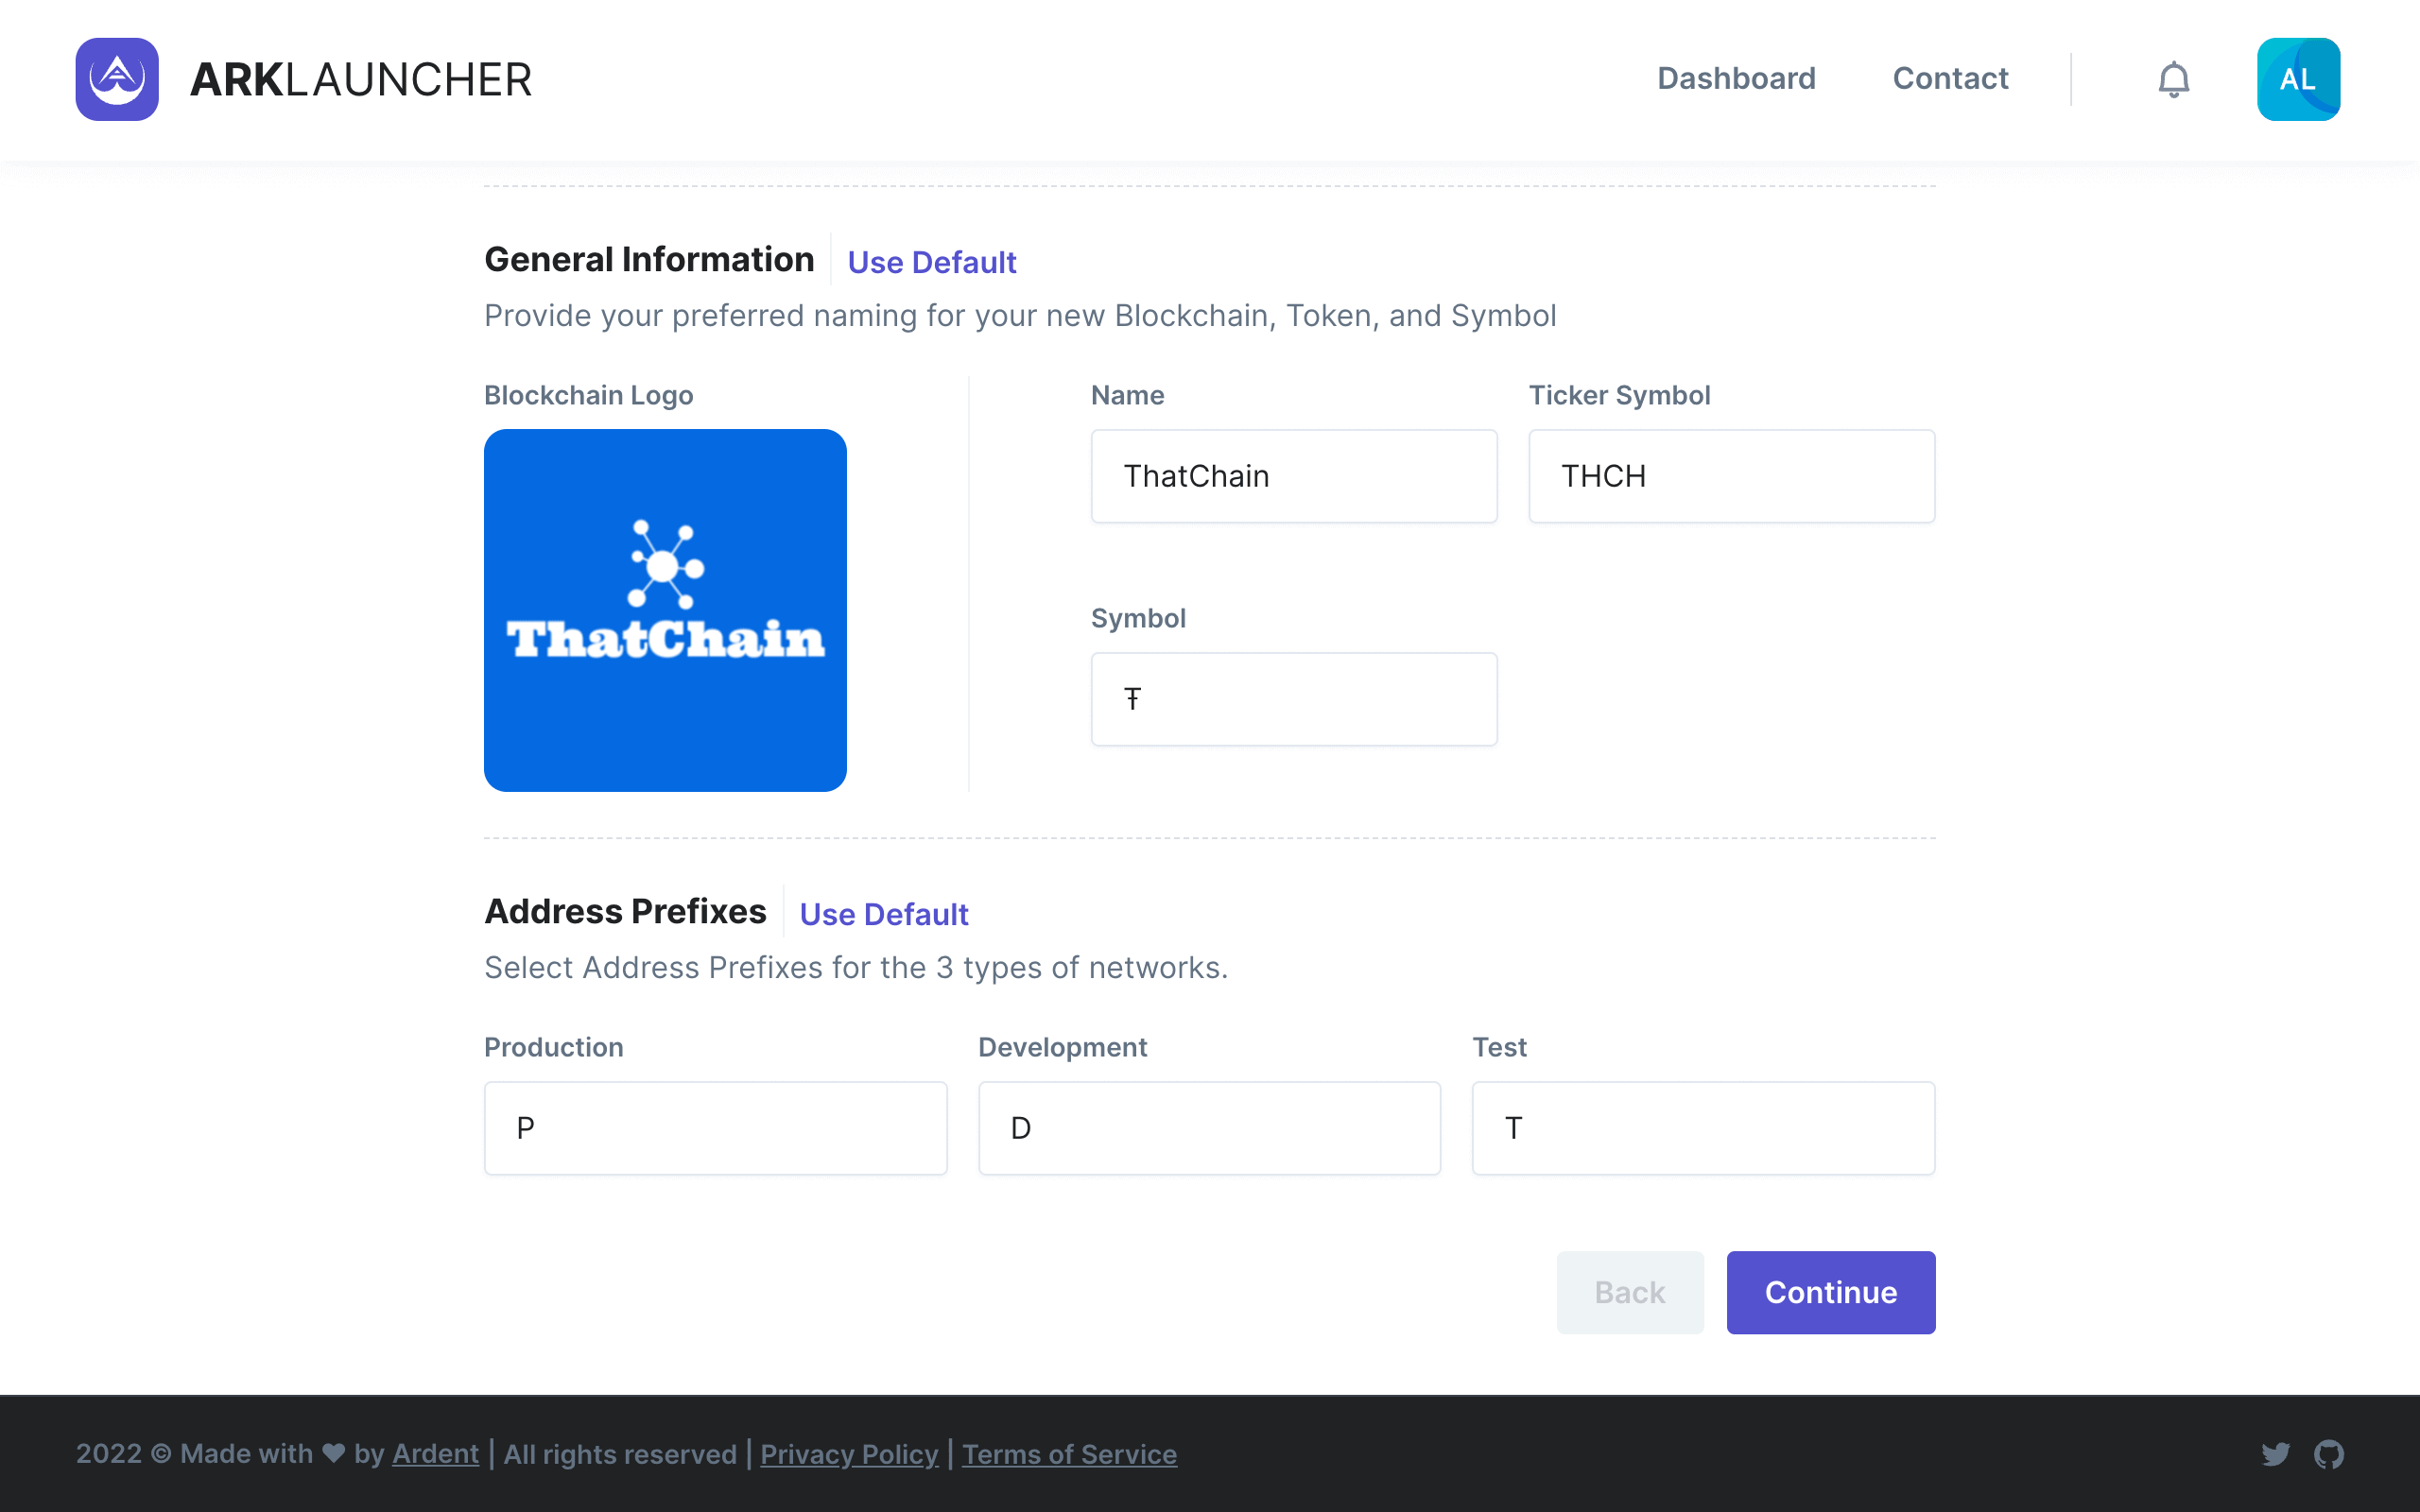
Blockchain Logo - Upload a logo for your custom blockchain by clicking on Upload Image and selecting the relevant image file. Note that the dimensions of your logo must equal or exceed 148 x 148 pixels and should ideally conform to the shape of a square. Also note that the maximum file size is limited to 5 MB.
Name - Enter in the name of your custom blockchain.
Ticker Symbol - This is an abbreviation that you will use for your blockchain’s native cryptoasset or token. Most tickers consist of three letters, but you may enter up to 4 in the provided field (also ensure that your chosen ticker is not already in use by another blockchain project on popular cryptocurrency aggregation sites).
Symbol - This is the symbol (consisting of a single character) that you will use to label and refer to your native cryptoasset. Ensure that you select a symbol that is not already in use and that is appropriate for use in the public sphere.
Address Prefixes - Here you will select address prefixes for the 3 types of networks you can use for your blockchain:
-
Production - Default value =
P -
Development - Default value =
D -
Test - Default value =
T
Information
If you do not wish to change any of the information in a given category, you may click any one of the Use Default buttons located throughout the customization step. This will assign defaults and allow you to continue with the blockchain setup process unimpeded.
Once you have filled in all the necessary details and reviewed the informaton, click the Continue button to proceed further.
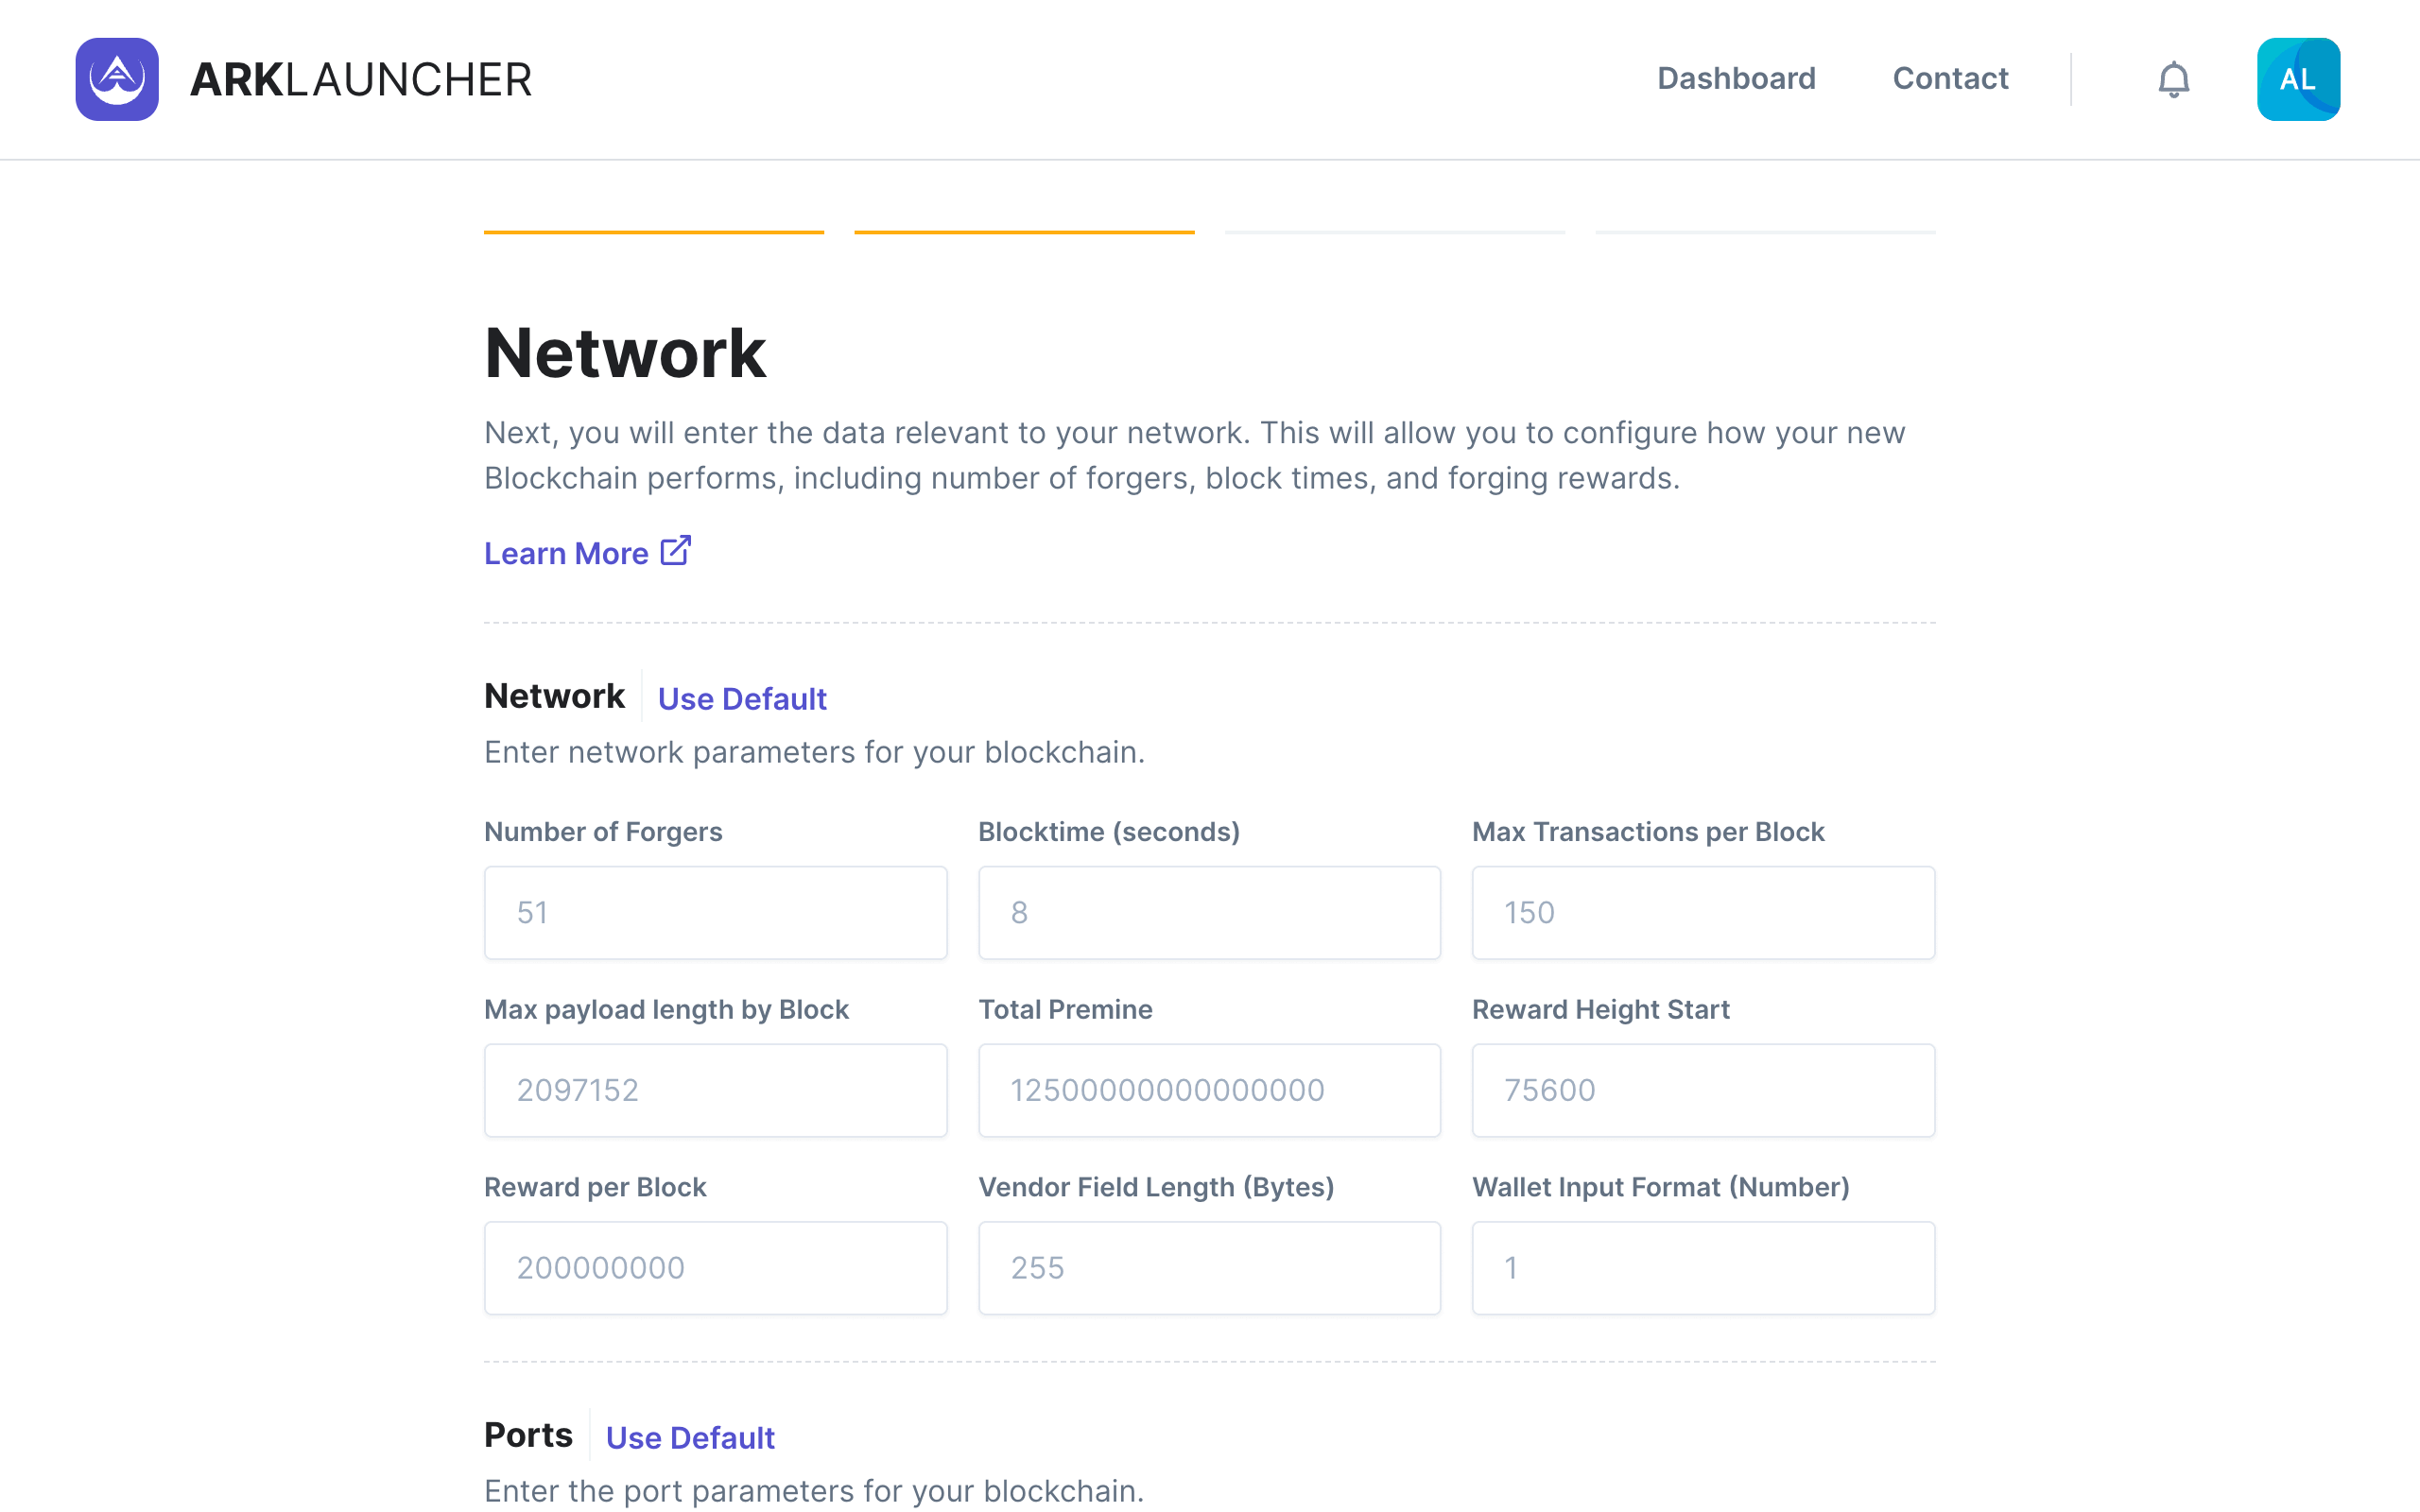
Network
The next step in the customization process entails configuring parameters relevant to your Network. This will determine how your custom blockchain operates as well as the number of forgers, block times, forging rewards and so on. You will noice that the Network page is divided into three sections, namely:
- Network
- Ports, and
- Database
Information
Denominations for all configuration values related to rewards, fees and so forth appear in Satoshis unless otherwise specified - in other words, 1 token = 1 * 1e8 Satoshi.
Number of Forgers - This allows you to set the number of Delegates that may enter an active forging position in your network. By default, the number of Forgers is set to 51.
Blocktime (seconds) - This determines the amount of time in seconds it takes Validators to verify transactions within a given block and subsequently produce a new block in your blockchain. By default, the bloctime is set to 8 seconds.
Max Transactions per Block - This refers to the maximum number of transactions that a single block in your blockchain can contain. The default value here is set to 150.
Max payload length by Block - Measured in bytes, this determines the maximum size of the data payload for a single block. By default, this is set to 2097152 bytes (which is the maximum allowable amount).
Total Premine - The total number of tokens you will create for your blockchain prior to its launch. This is set to 12500000000000000 (or 125 million tokens) by default.
Reward Height Start - The block height at which forging rewards will begin to come into effect. By default, this value is set at a height of 75,600.
Reward per Block - This is the total reward a single block will yield for Validators. This is set to 200000000 (or 2 tokens) by default.
Vendor Field Length (Bytes) - The maximum length of the Vendor Field which allows participants to attach custom messages to transactions. By default, the length is set to 255 bytes.
Wallet Input Format (Number) - As stated, this is the Wallet Input Format for your custom blockchain. By default, the value here is set to 1.
Information
You may click on Use Default in any given section if you do not wish to customize the parameters contained therein.
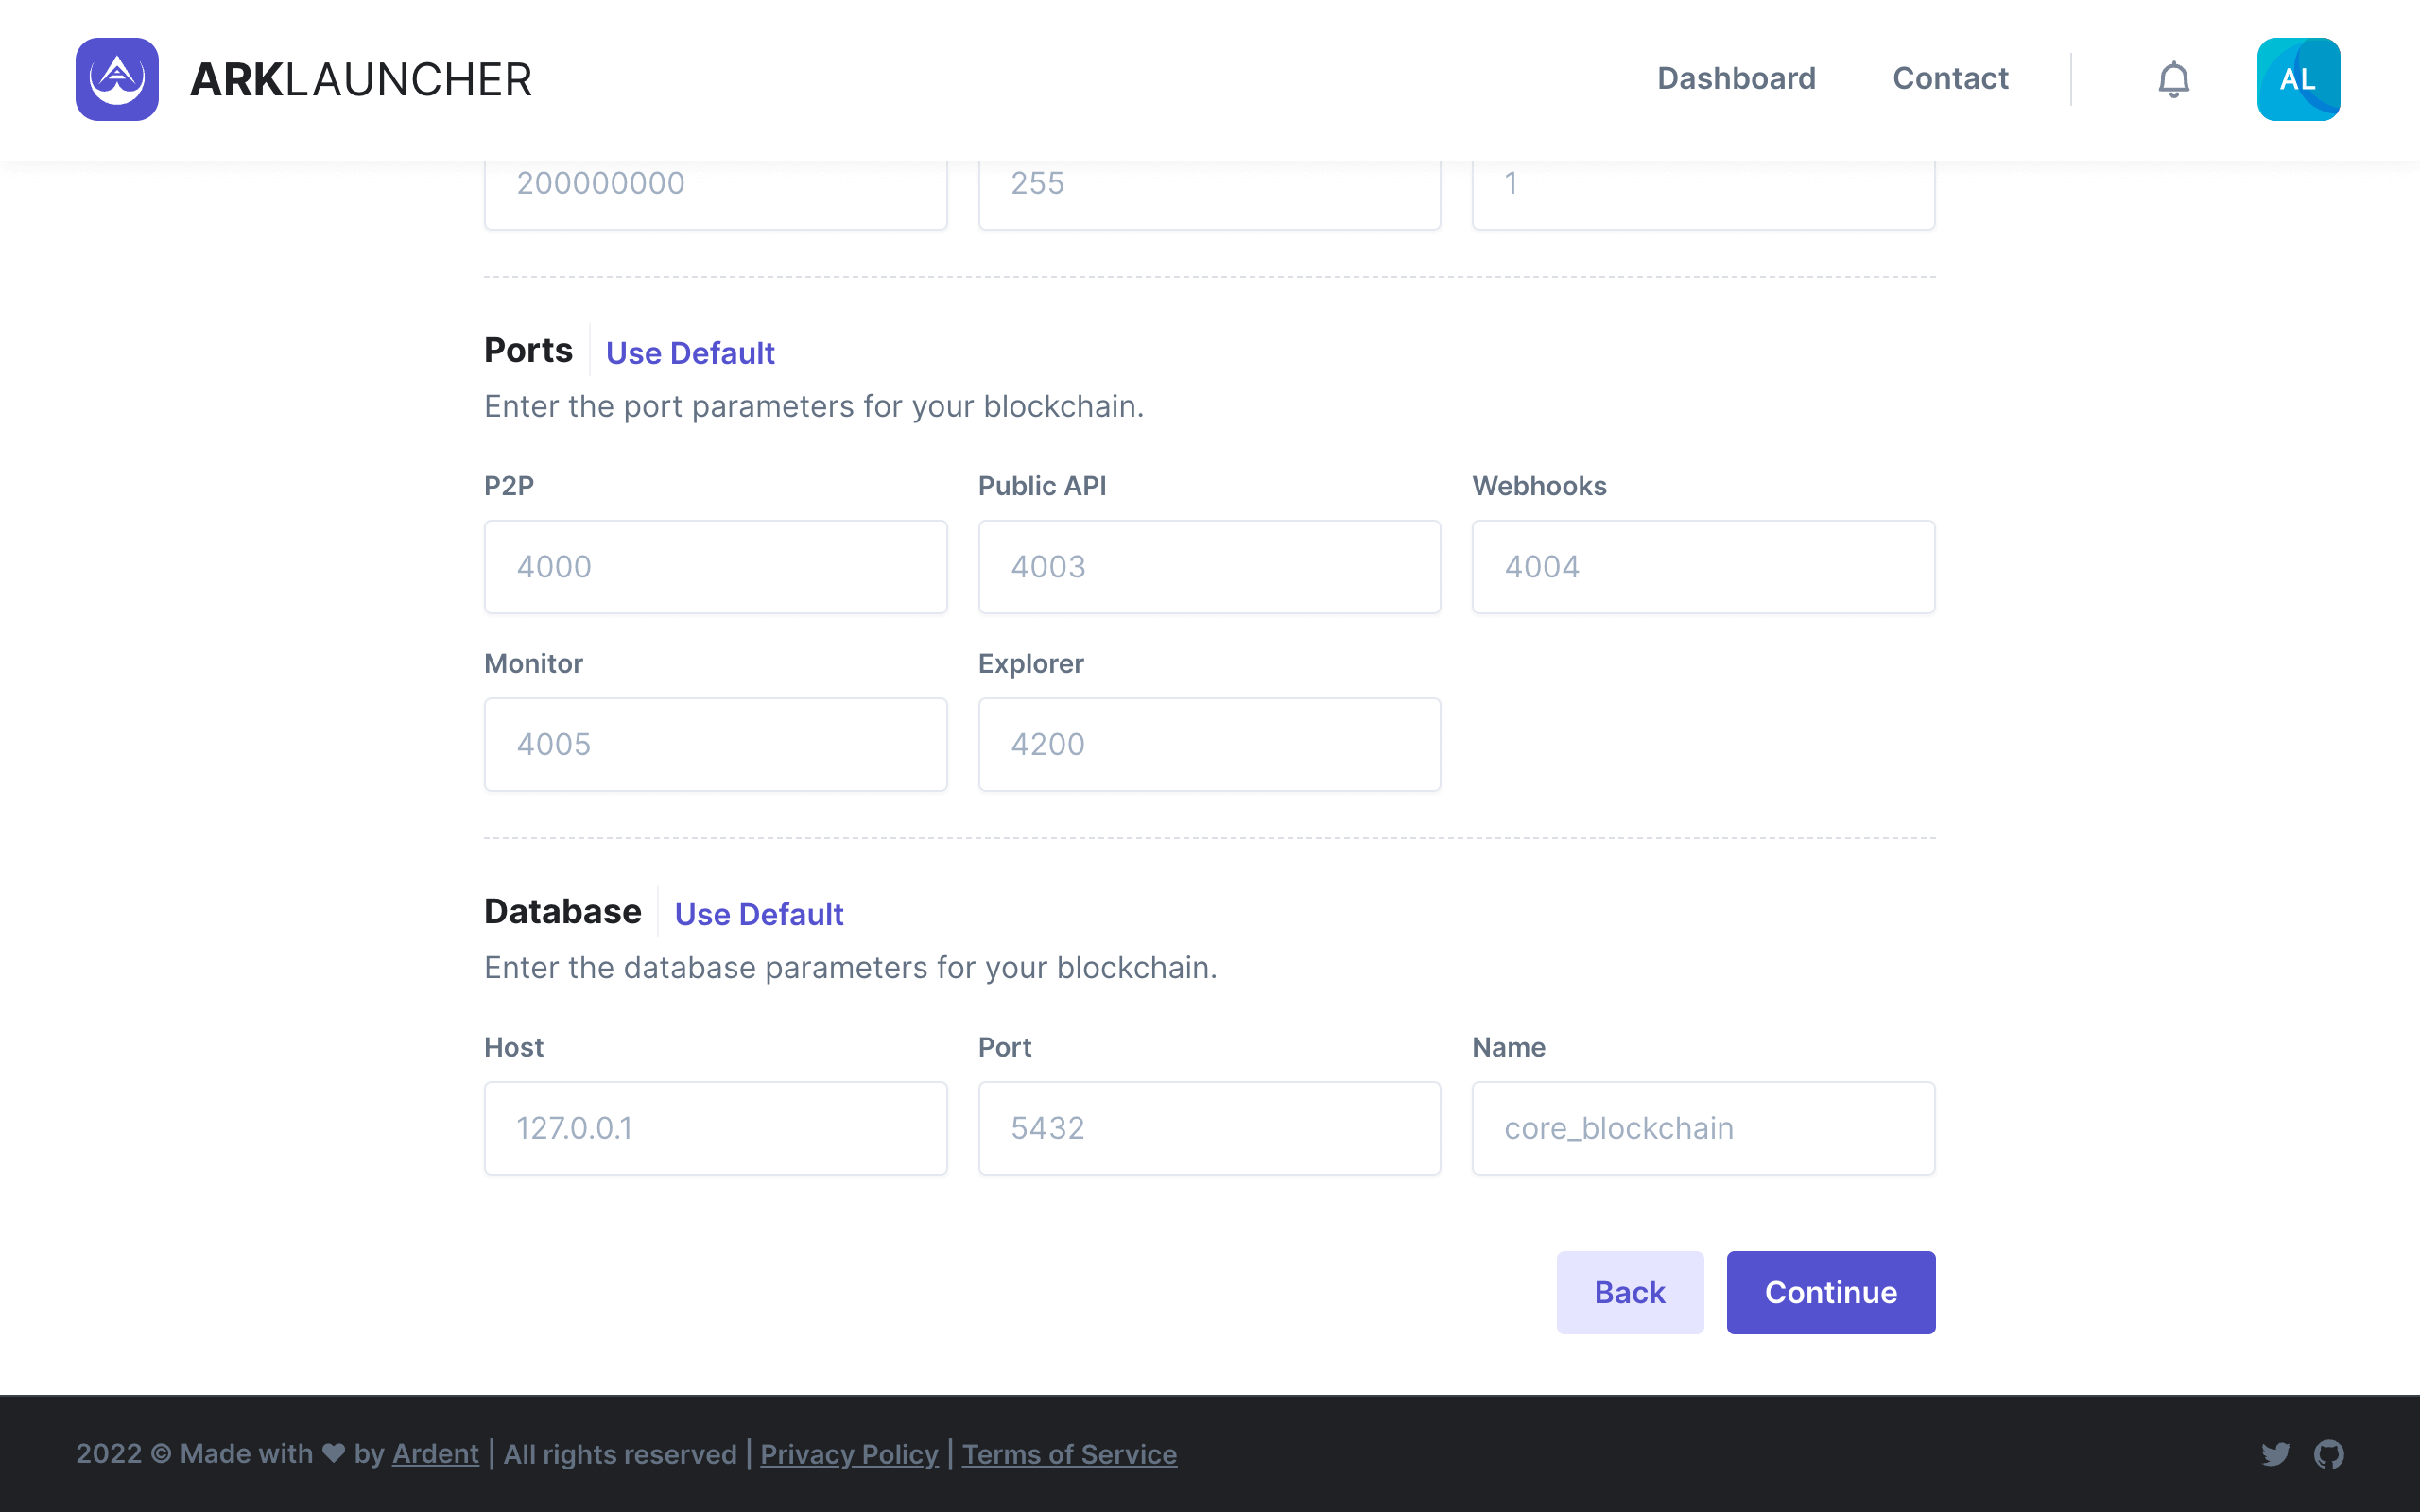
You will then need to fill out the relevant fields under Ports:
-
P2P - Enter the number for the Peer-to-Peer (P2P) port for your blockchain. By default, this is set to
4000 -
Public API - Enter the number for your blockchain’s Public Application Programming Interface (API). By default, this is set to
4003 -
Webhooks - Enter the number for Webhooks for your blockchain. By default, this is set to
4004 -
Monitor - Enter the number for the Monitor for your blockchain. By default, this is set to
4005 -
Explorer - Enter the number for the Explorer for your blockchain. By default, this is set to
4200
To finalize setting up your network, you will need to fill out the details related to your Database:
-
Host - Enter the IP address for your database. This is set to
127.0.0.1by default -
Port - Enter the port number for your database. By default, this is set to
5432 -
Name - Enter the name of your database. This is set to
core_blockchainby default
Upon entering all the necessary details on the Network page, click the Continue button to proceed further.
Fees
The next part of the customization process involves configuring parameters related to Fees. You will need to fill out all the relevant fields and define minimum amounts as well as static fees and add-ons for dynamic fees. You will notice that the Fees page is divided into nine sections, namely:
- Transaction Pool
- Transfer
- Second Signature
- Delegate Registration
- Vote
- Multisignature
- IPFS
- Multipayments, and
- Delegate Resignation
Help
You may enable or disable Dynamic Fees by toggling the switch located directly above Transaction Pool. Dynamic fees gives your network the ability to calculate fees based on the type and size of a transaction.
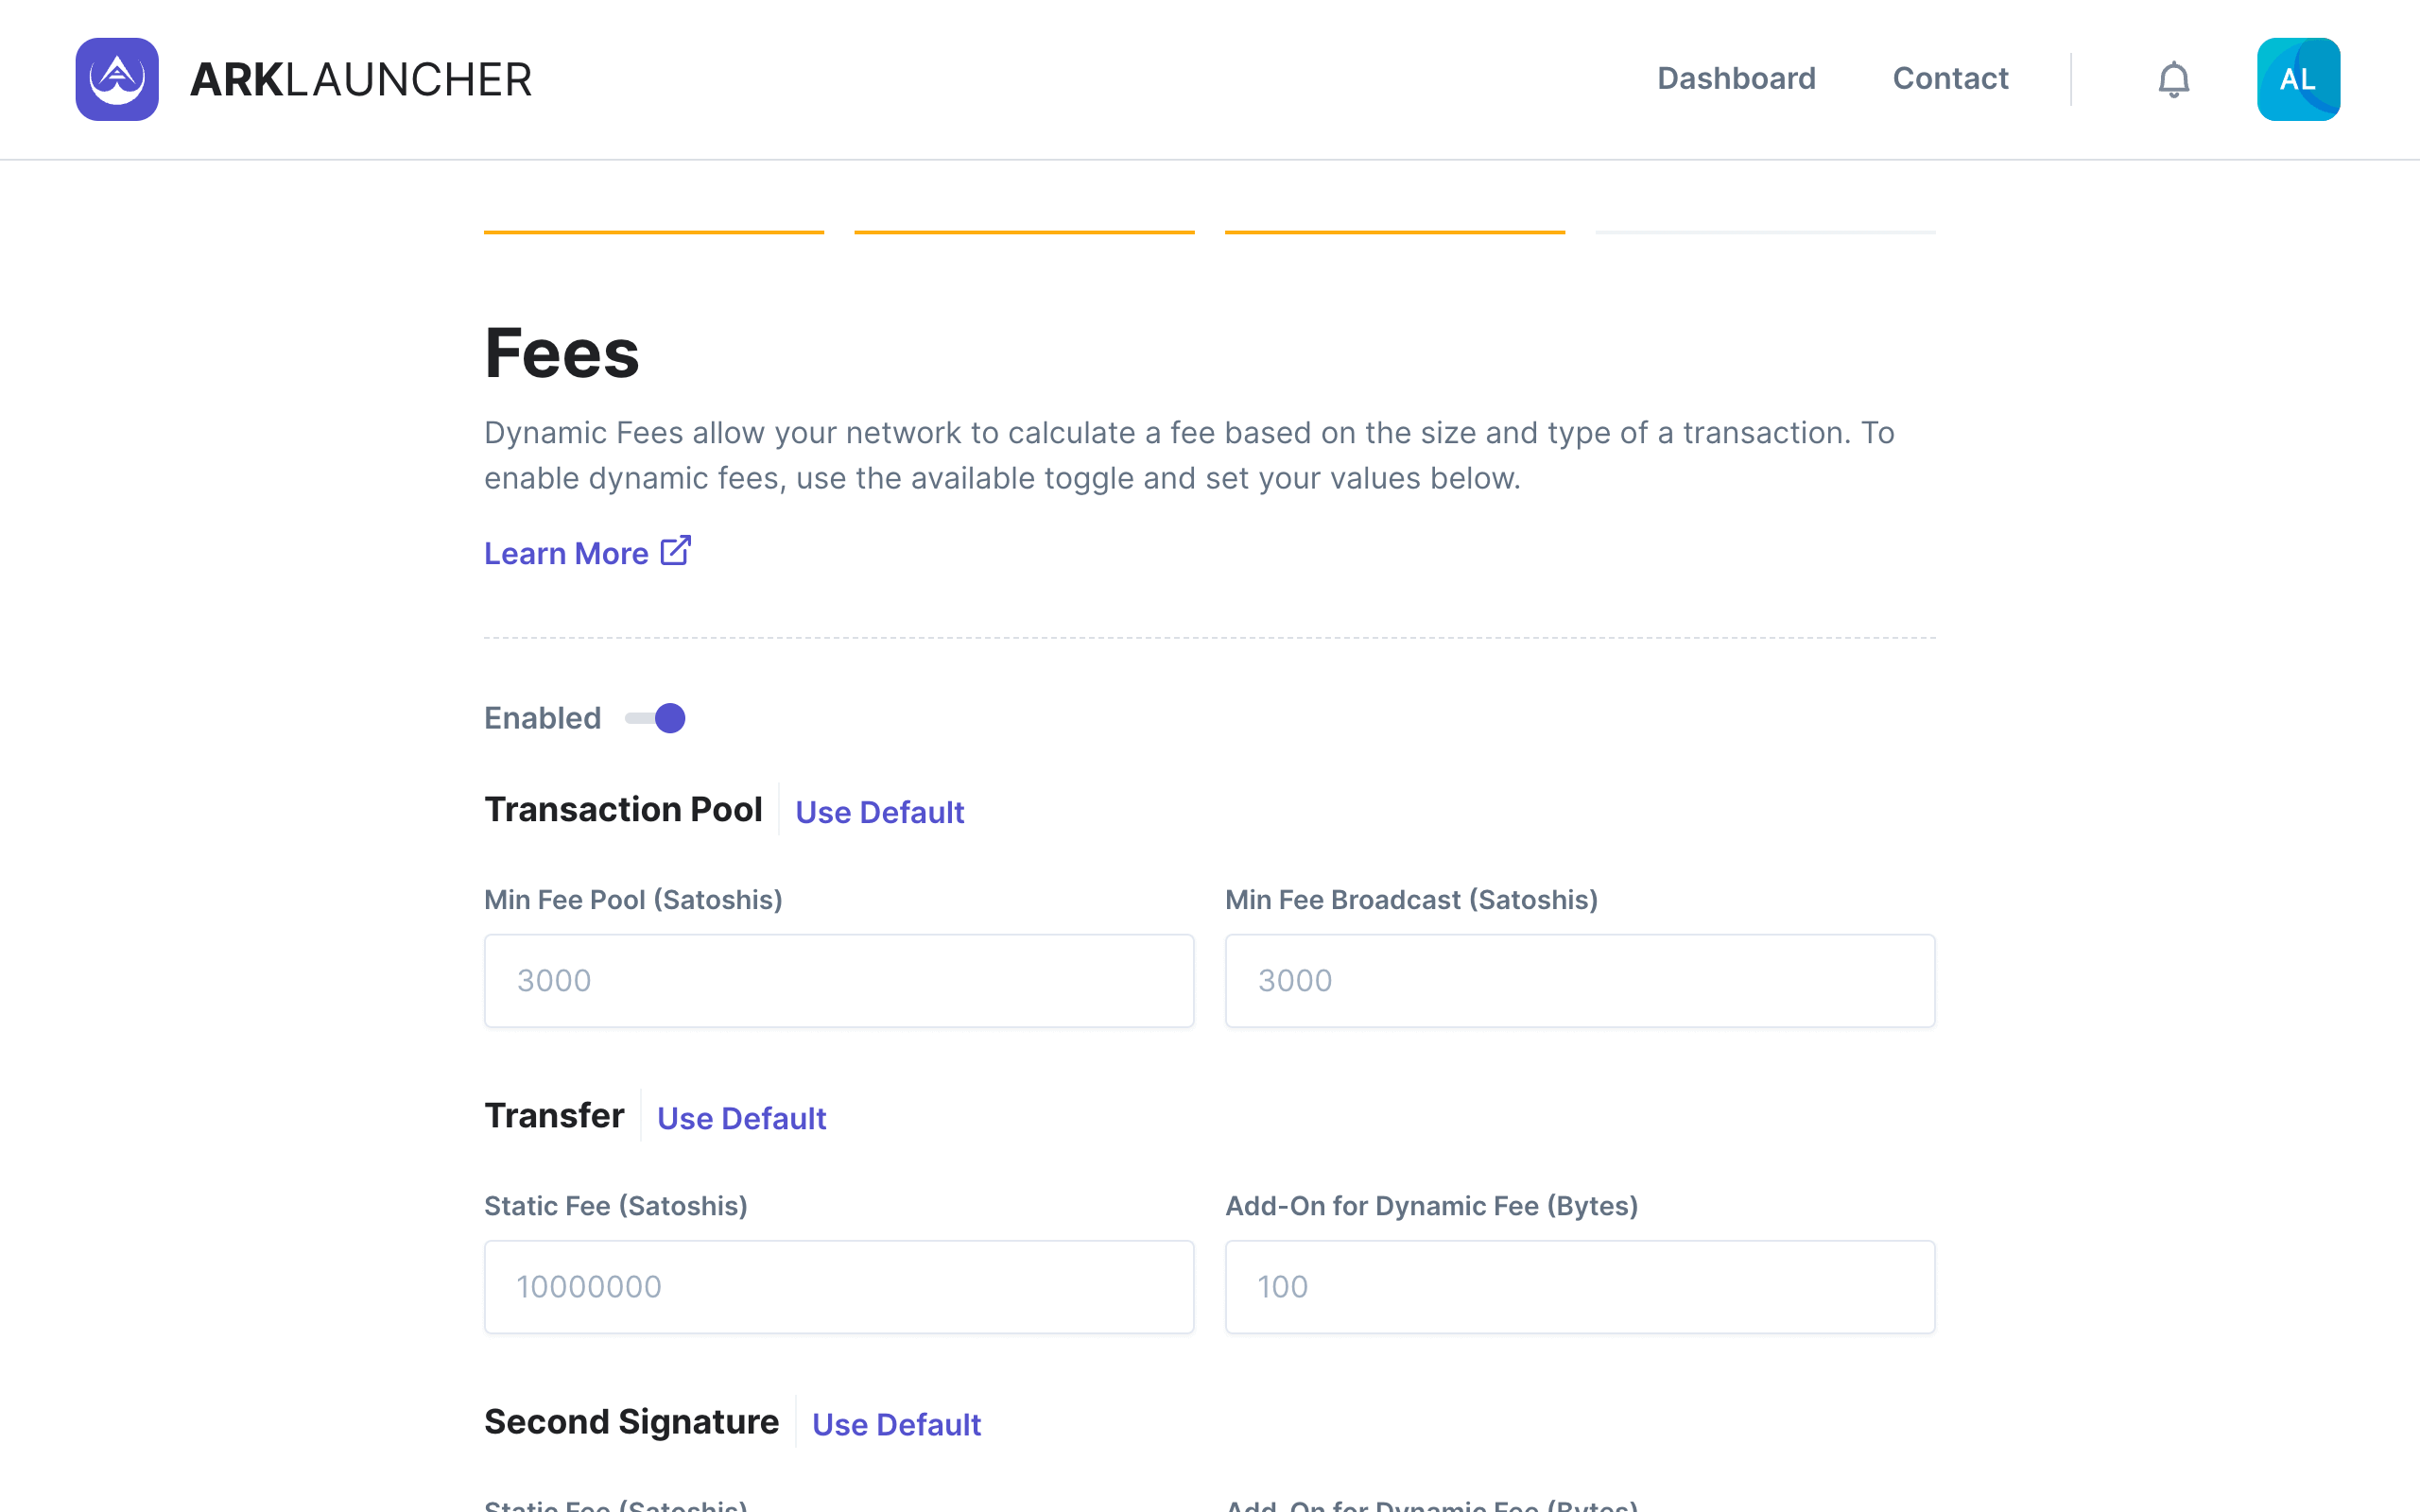
Transaction Pool - Here you will need to set the minimum fee pool as well as the minimum fee broadcast, each of which is denominated in Satoshis. The default value for both of these fields is set at 3,000 Satoshis.
Transfer - Here you will need to set the static fee (denominated in Satoshis) as well as the add-on for dynamic fees (in bytes). The default value for the static fee is set at 10,000,000 Satoshis while the default value for the dynamic fee is set at 100 bytes.
Information
You may click on Use Default in any given section if you do not wish to customize the parameters contained therein.
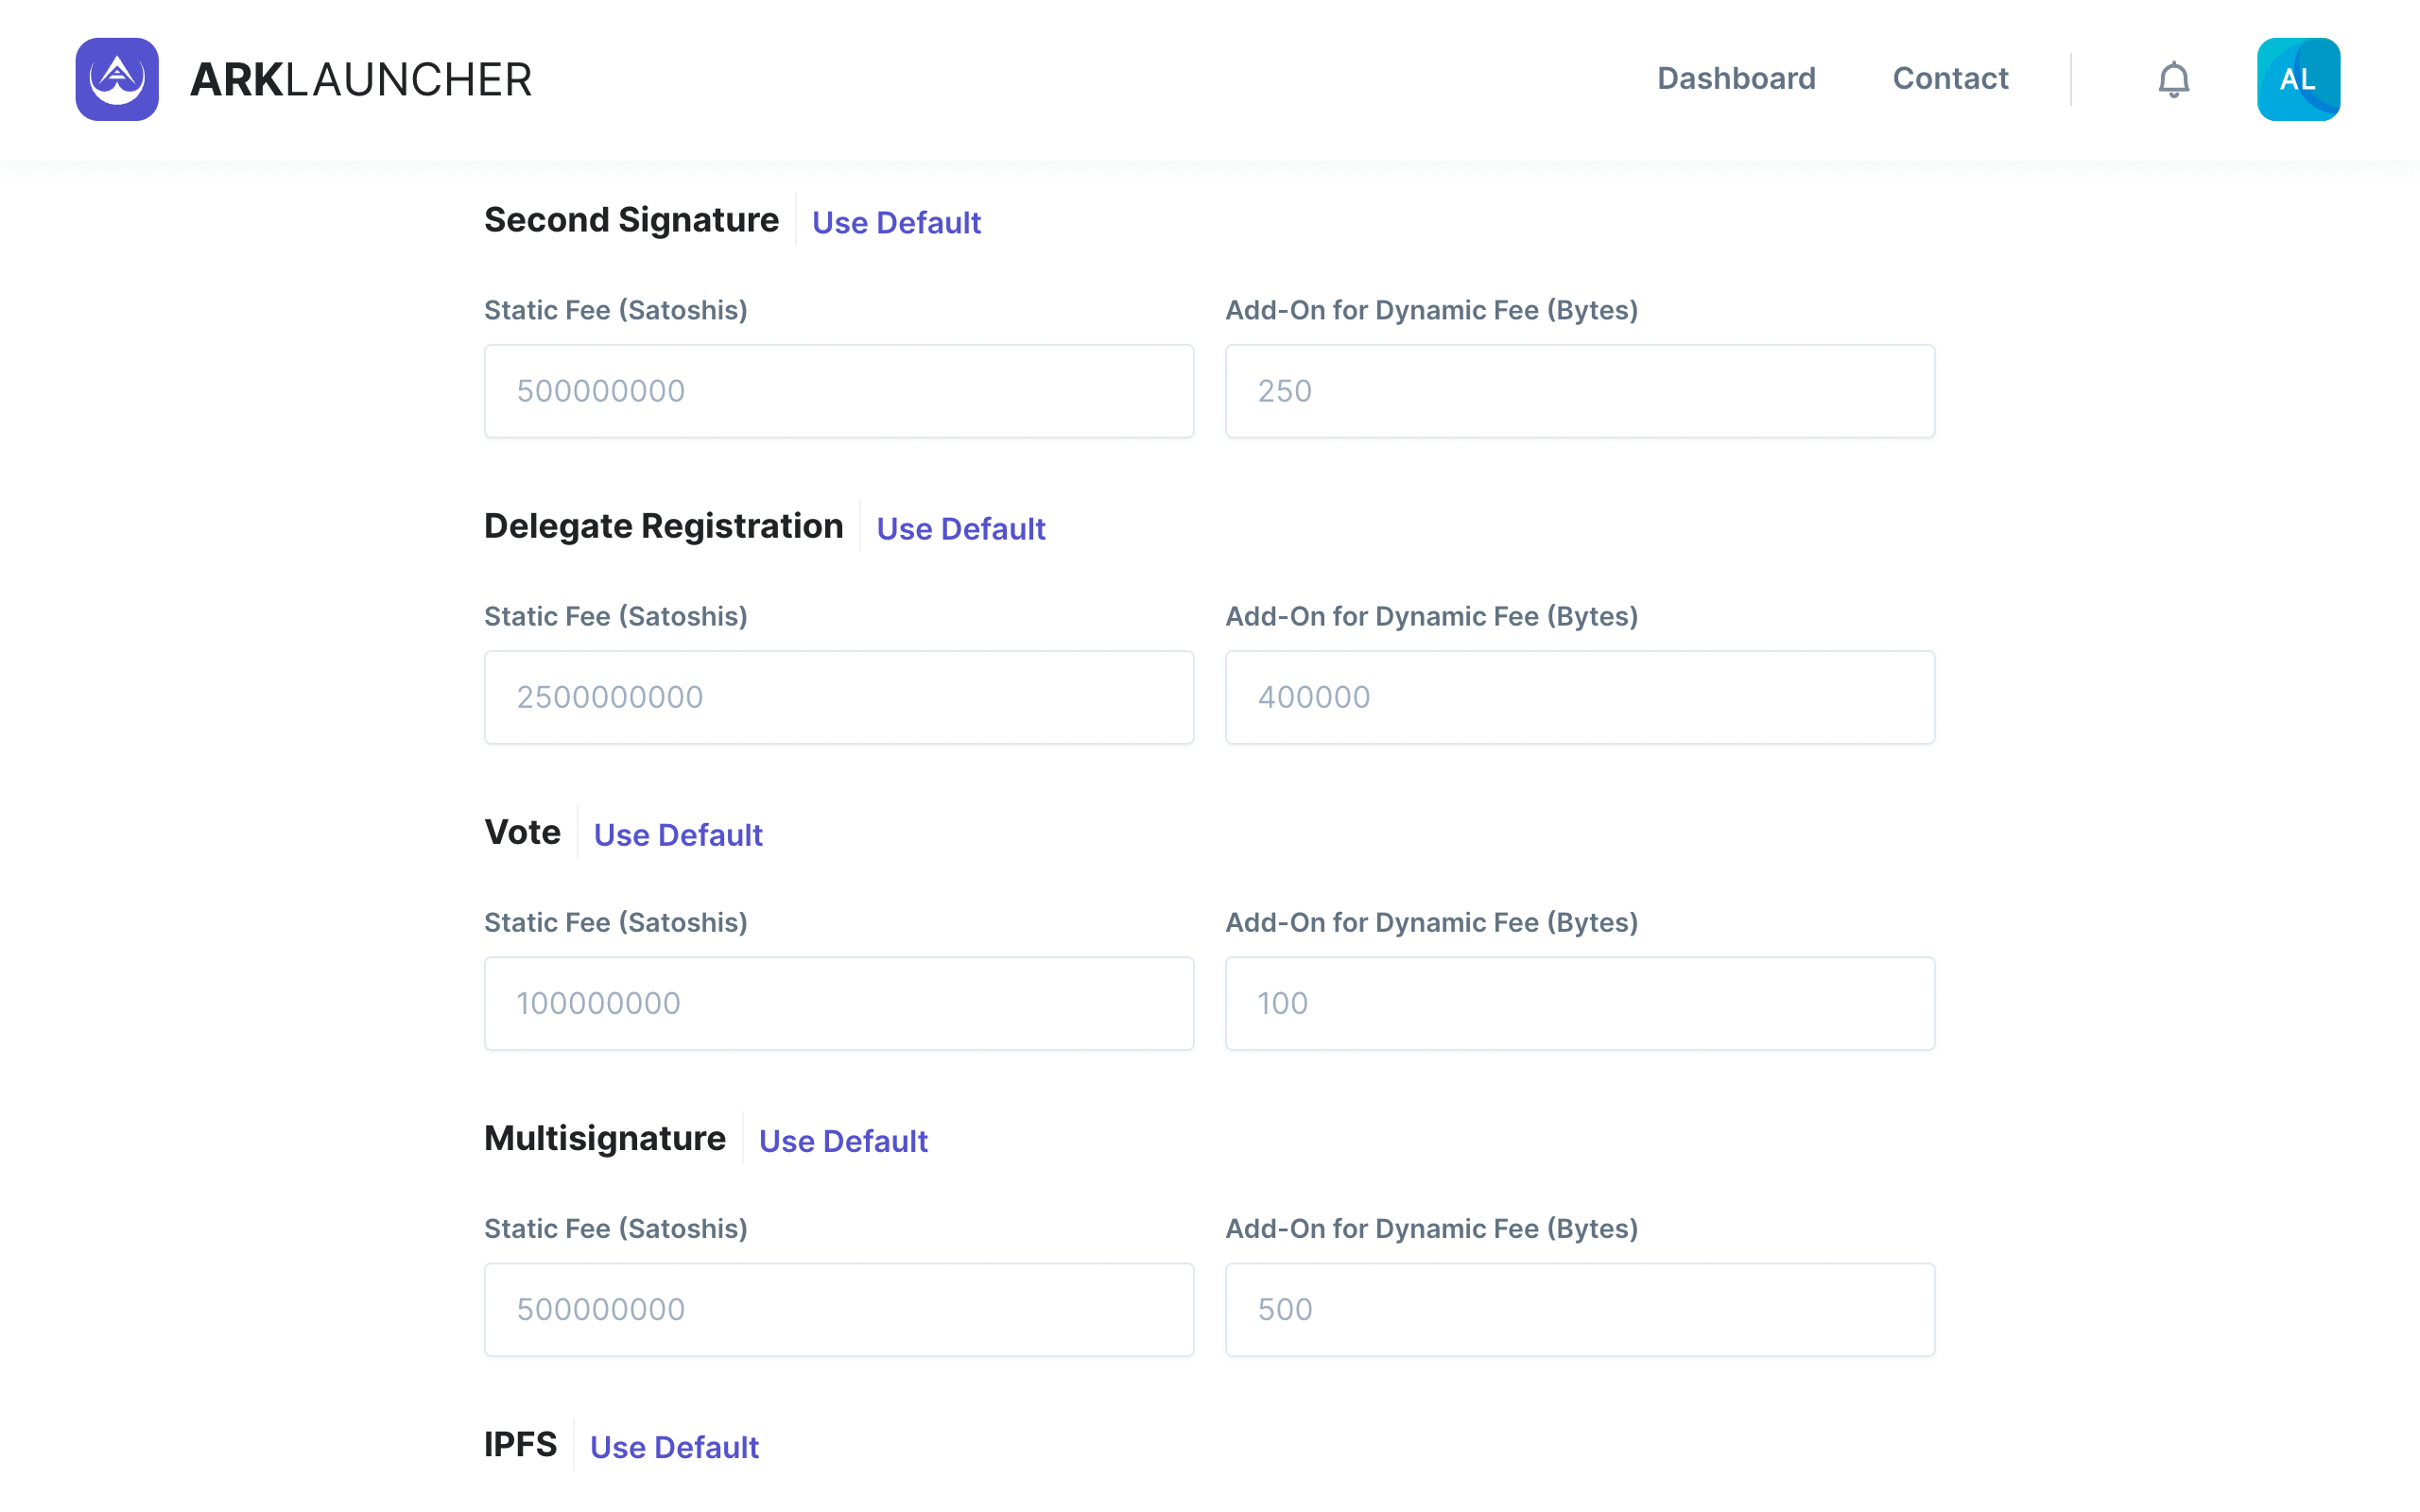
Second Signature - Here you will need to set the static fee (denominated in Satoshis) as well as the add-on for dynamic fees (in bytes). The default value for the static fee is set at 500,000,000 Satoshis while the default value for the dynamic fee is set at 250 bytes.
Delegate Registration - Here you will need to set the static fee (denominated in Satoshis) as well as the add-on for dynamic fees (in bytes). The default value for the static fee is set at 2,500,000,000 Satoshis while the default value for the dynamic fee is set at 400,000 bytes.
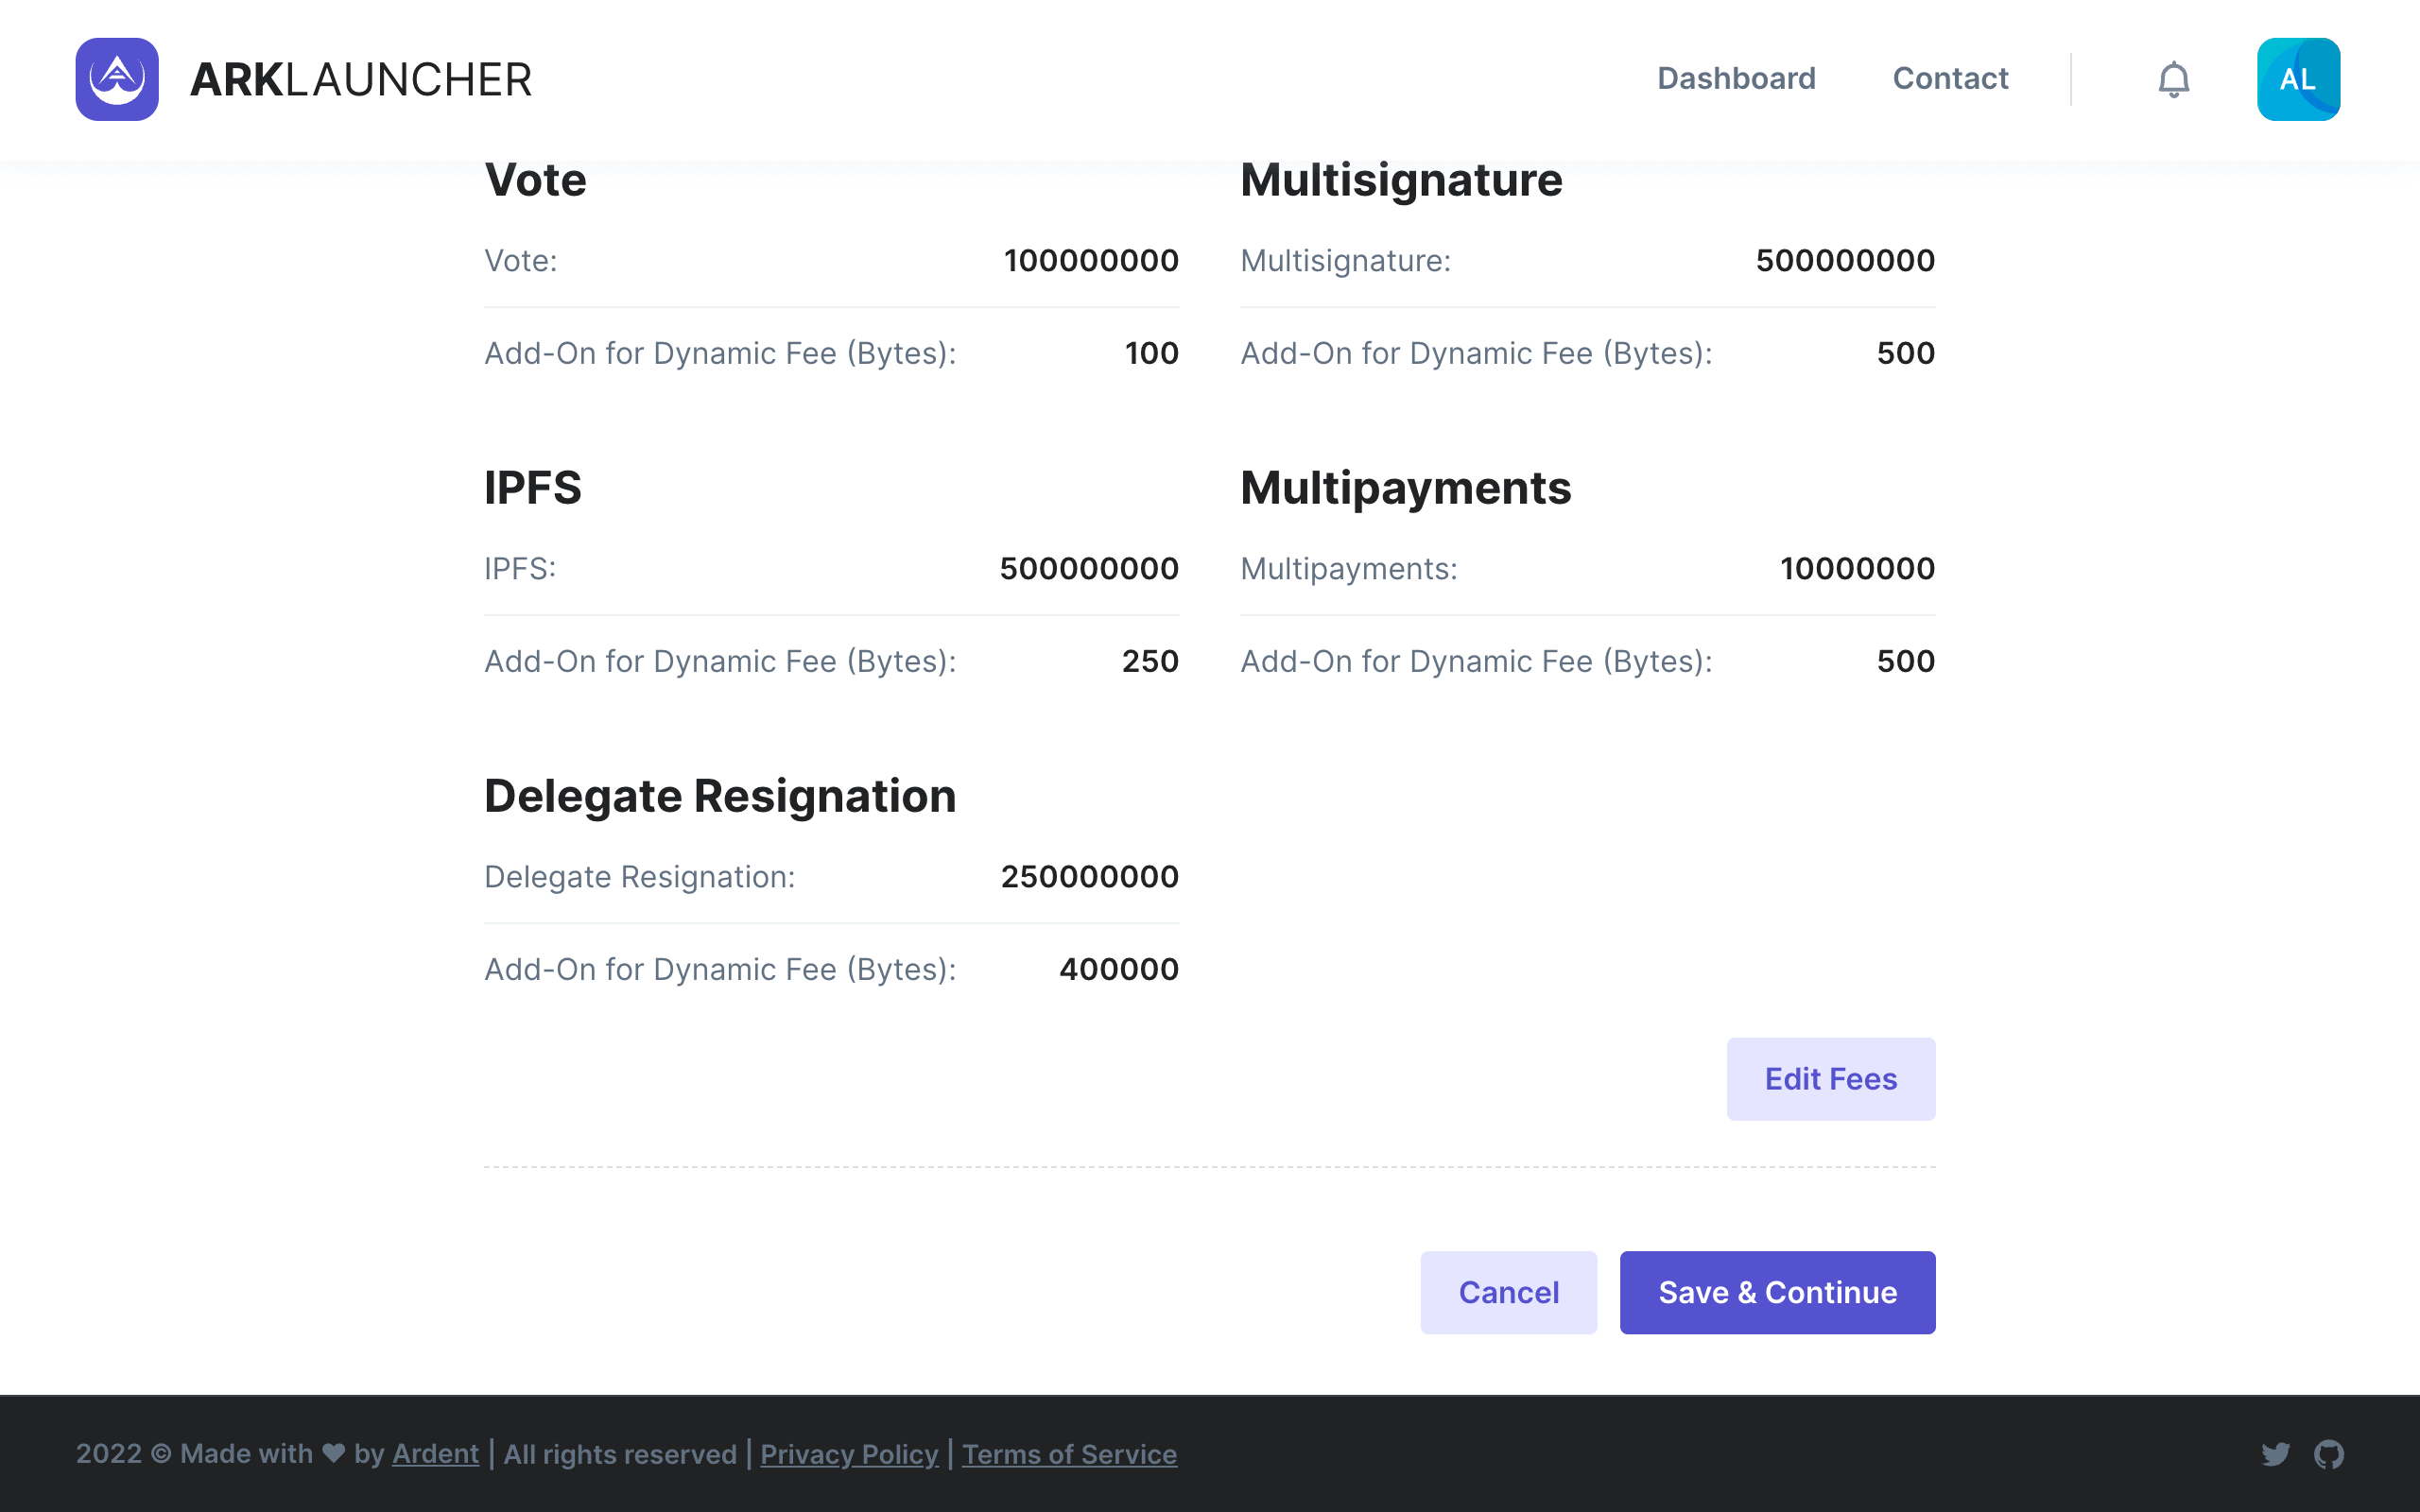
Vote - Here you will need to set the static fee (denominated in Satoshis) as well as the add-on for dynamic fees (in bytes). The default value for the static fee is set at 2,100,000,000 Satoshis while the default value for the dynamic fee is set at 100 bytes.
Multisignature - Here you will need to set the static fee (denominated in Satoshis) as well as the add-on for dynamic fees (in bytes). The default value for the static fee is set at 500,000,000 Satoshis while the default value for the dynamic fee is set at 500 bytes.

IPFS - Here you will need to set the static fee (denominated in Satoshis) as well as the add-on for dynamic fees (in bytes). The default value for the static fee is set at 500,000,000 Satoshis while the default value for the dynamic fee is set at 250 bytes.
Multipayments - Here you will need to set the static fee (denominated in Satoshis) as well as the add-on for dynamic fees (in bytes). The default value for the static fee is set at 10,000,000 Satoshis while the default value for the dynamic fee is set at 500 bytes.
Delegate Resignation - Here you will need to set the static fee (denominated in Satoshis) as well as the add-on for dynamic fees (in bytes). The default value for the static fee is set at 250,000,000 Satoshis while the default value for the dynamic fee is set at 400,000 bytes.
Upon entering all the necessary details on the Fees page, click the Continue button to proceed to the final step in the customization process.
Review
The final part of the customization process entails reviewing all the details regarding your custom blockchain. The Review page is divided into three main sections, namely:
- General
- Network, and
- Fees
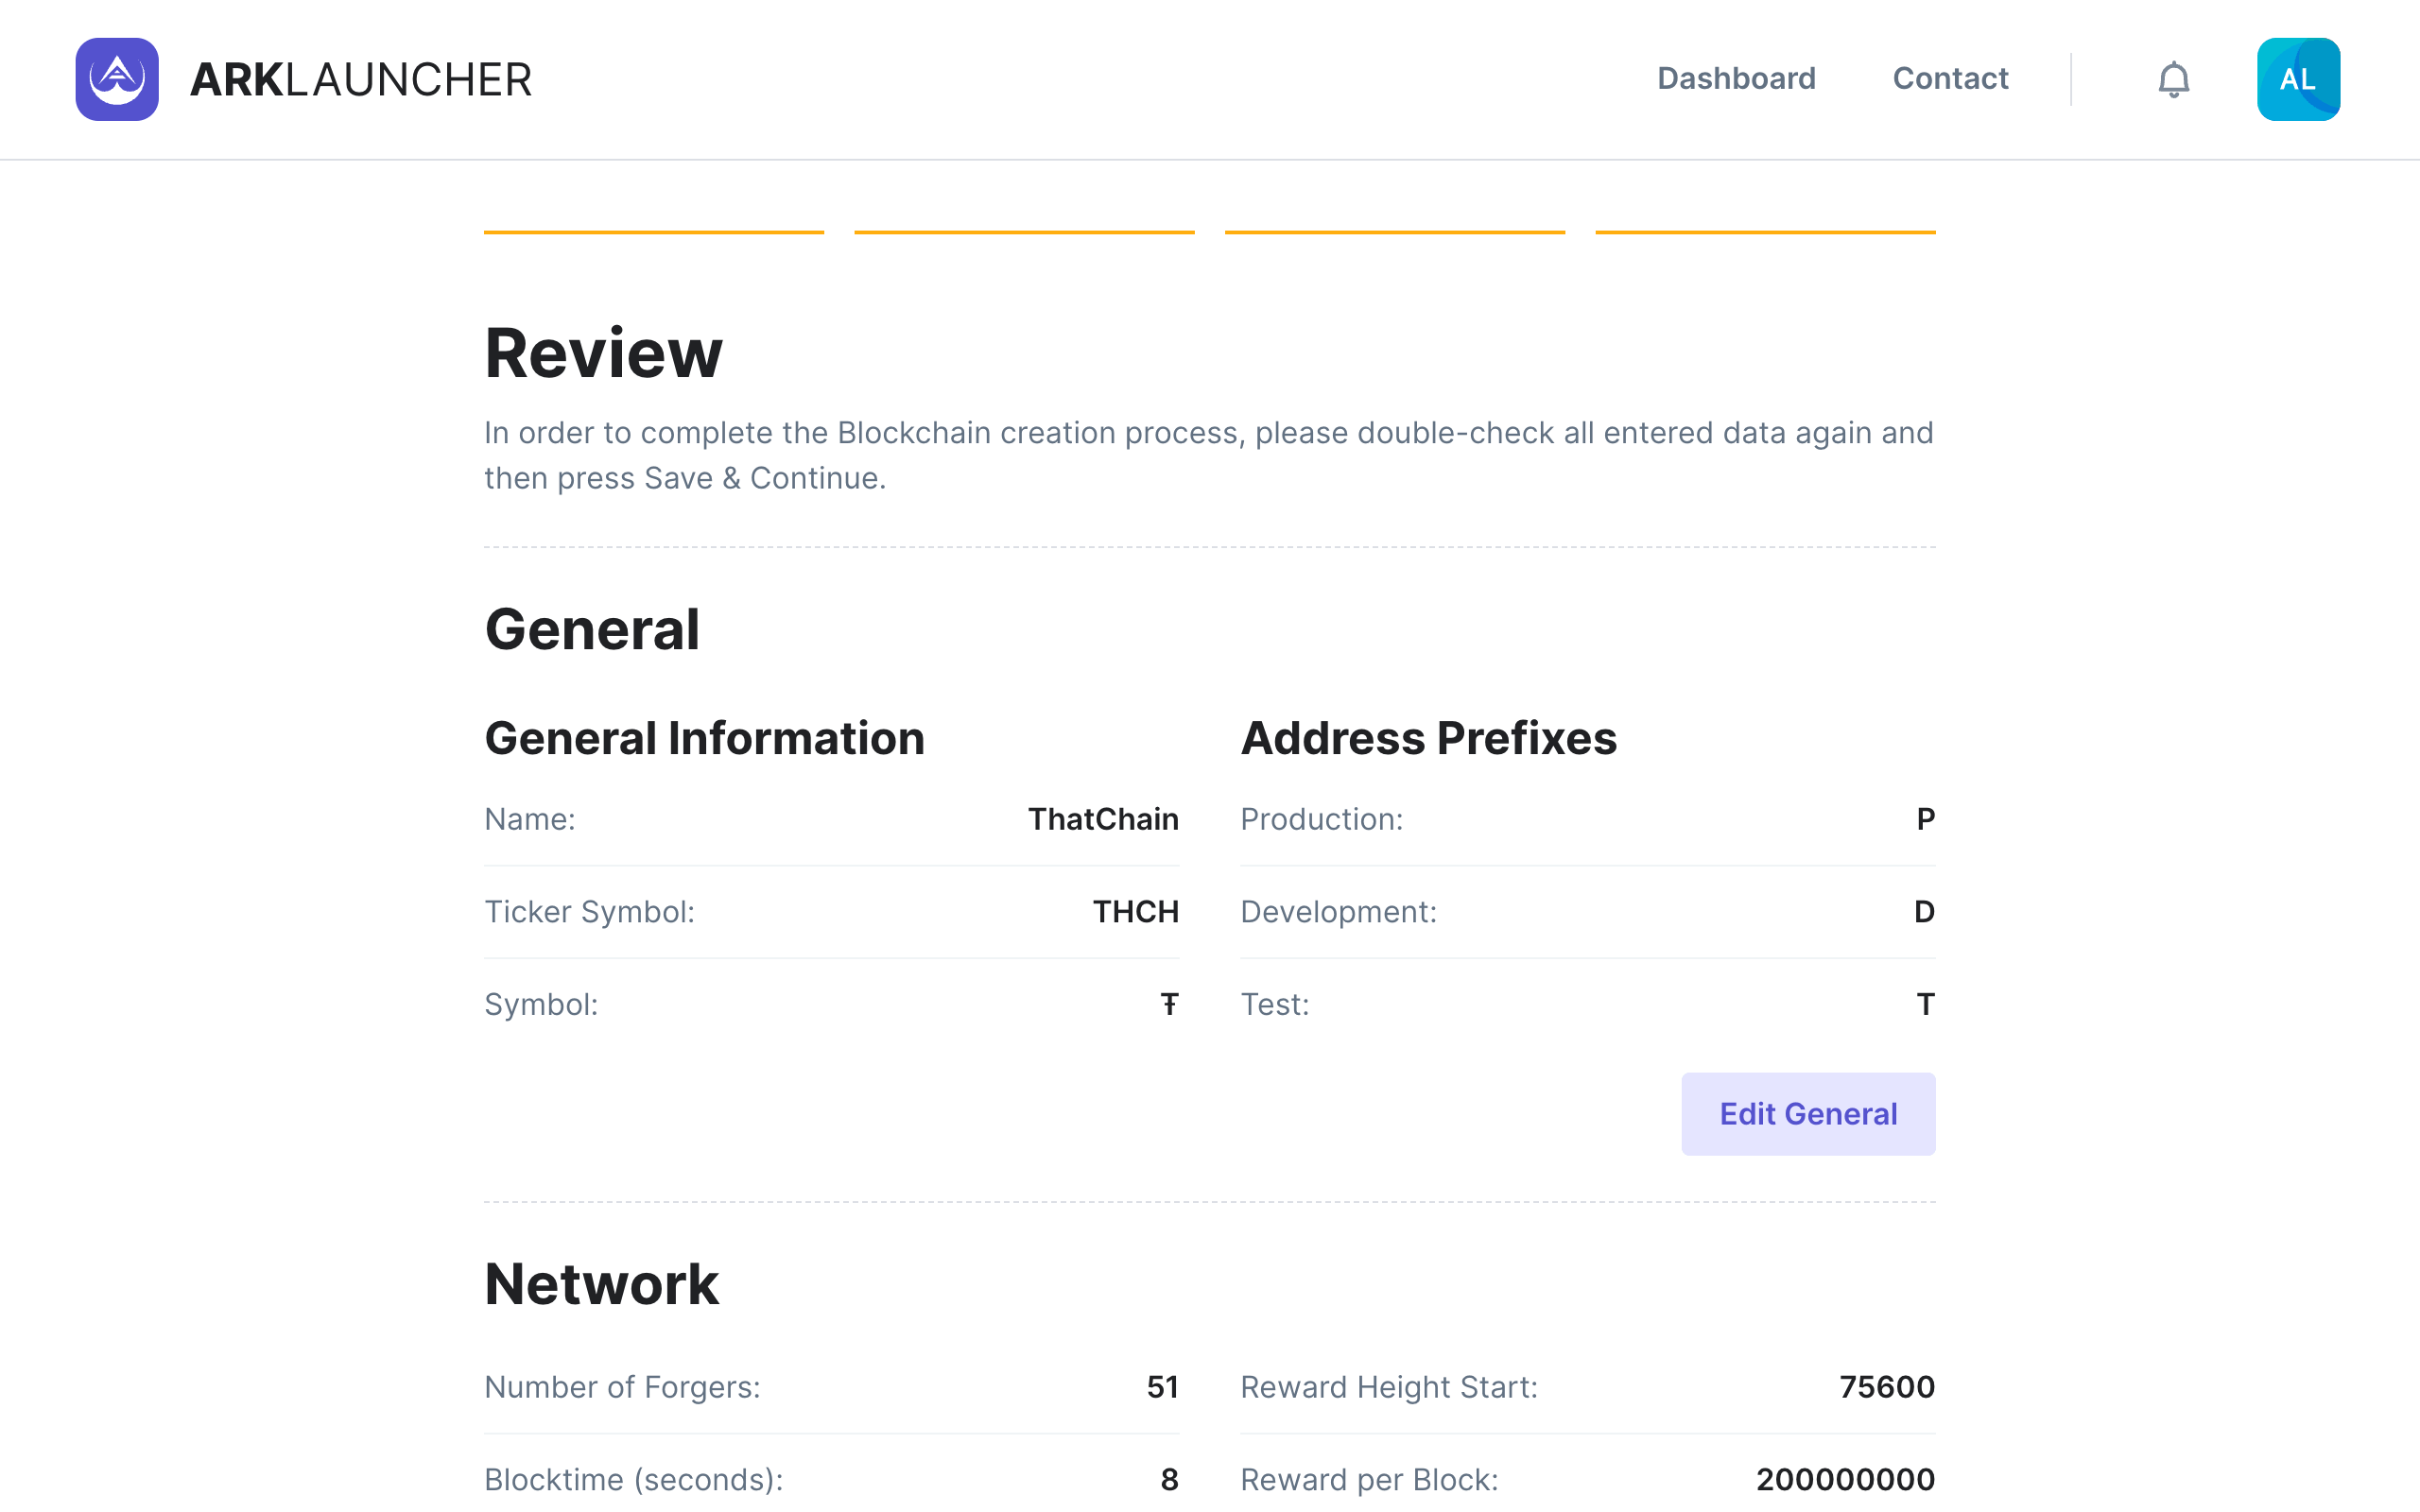
The General section details the name, ticker symbol and symbol of your blockchain as well as the address prefixes for your production, development and test networks. If you wish to edit any of the information, click the Edit General button located at the bottom right of this section.
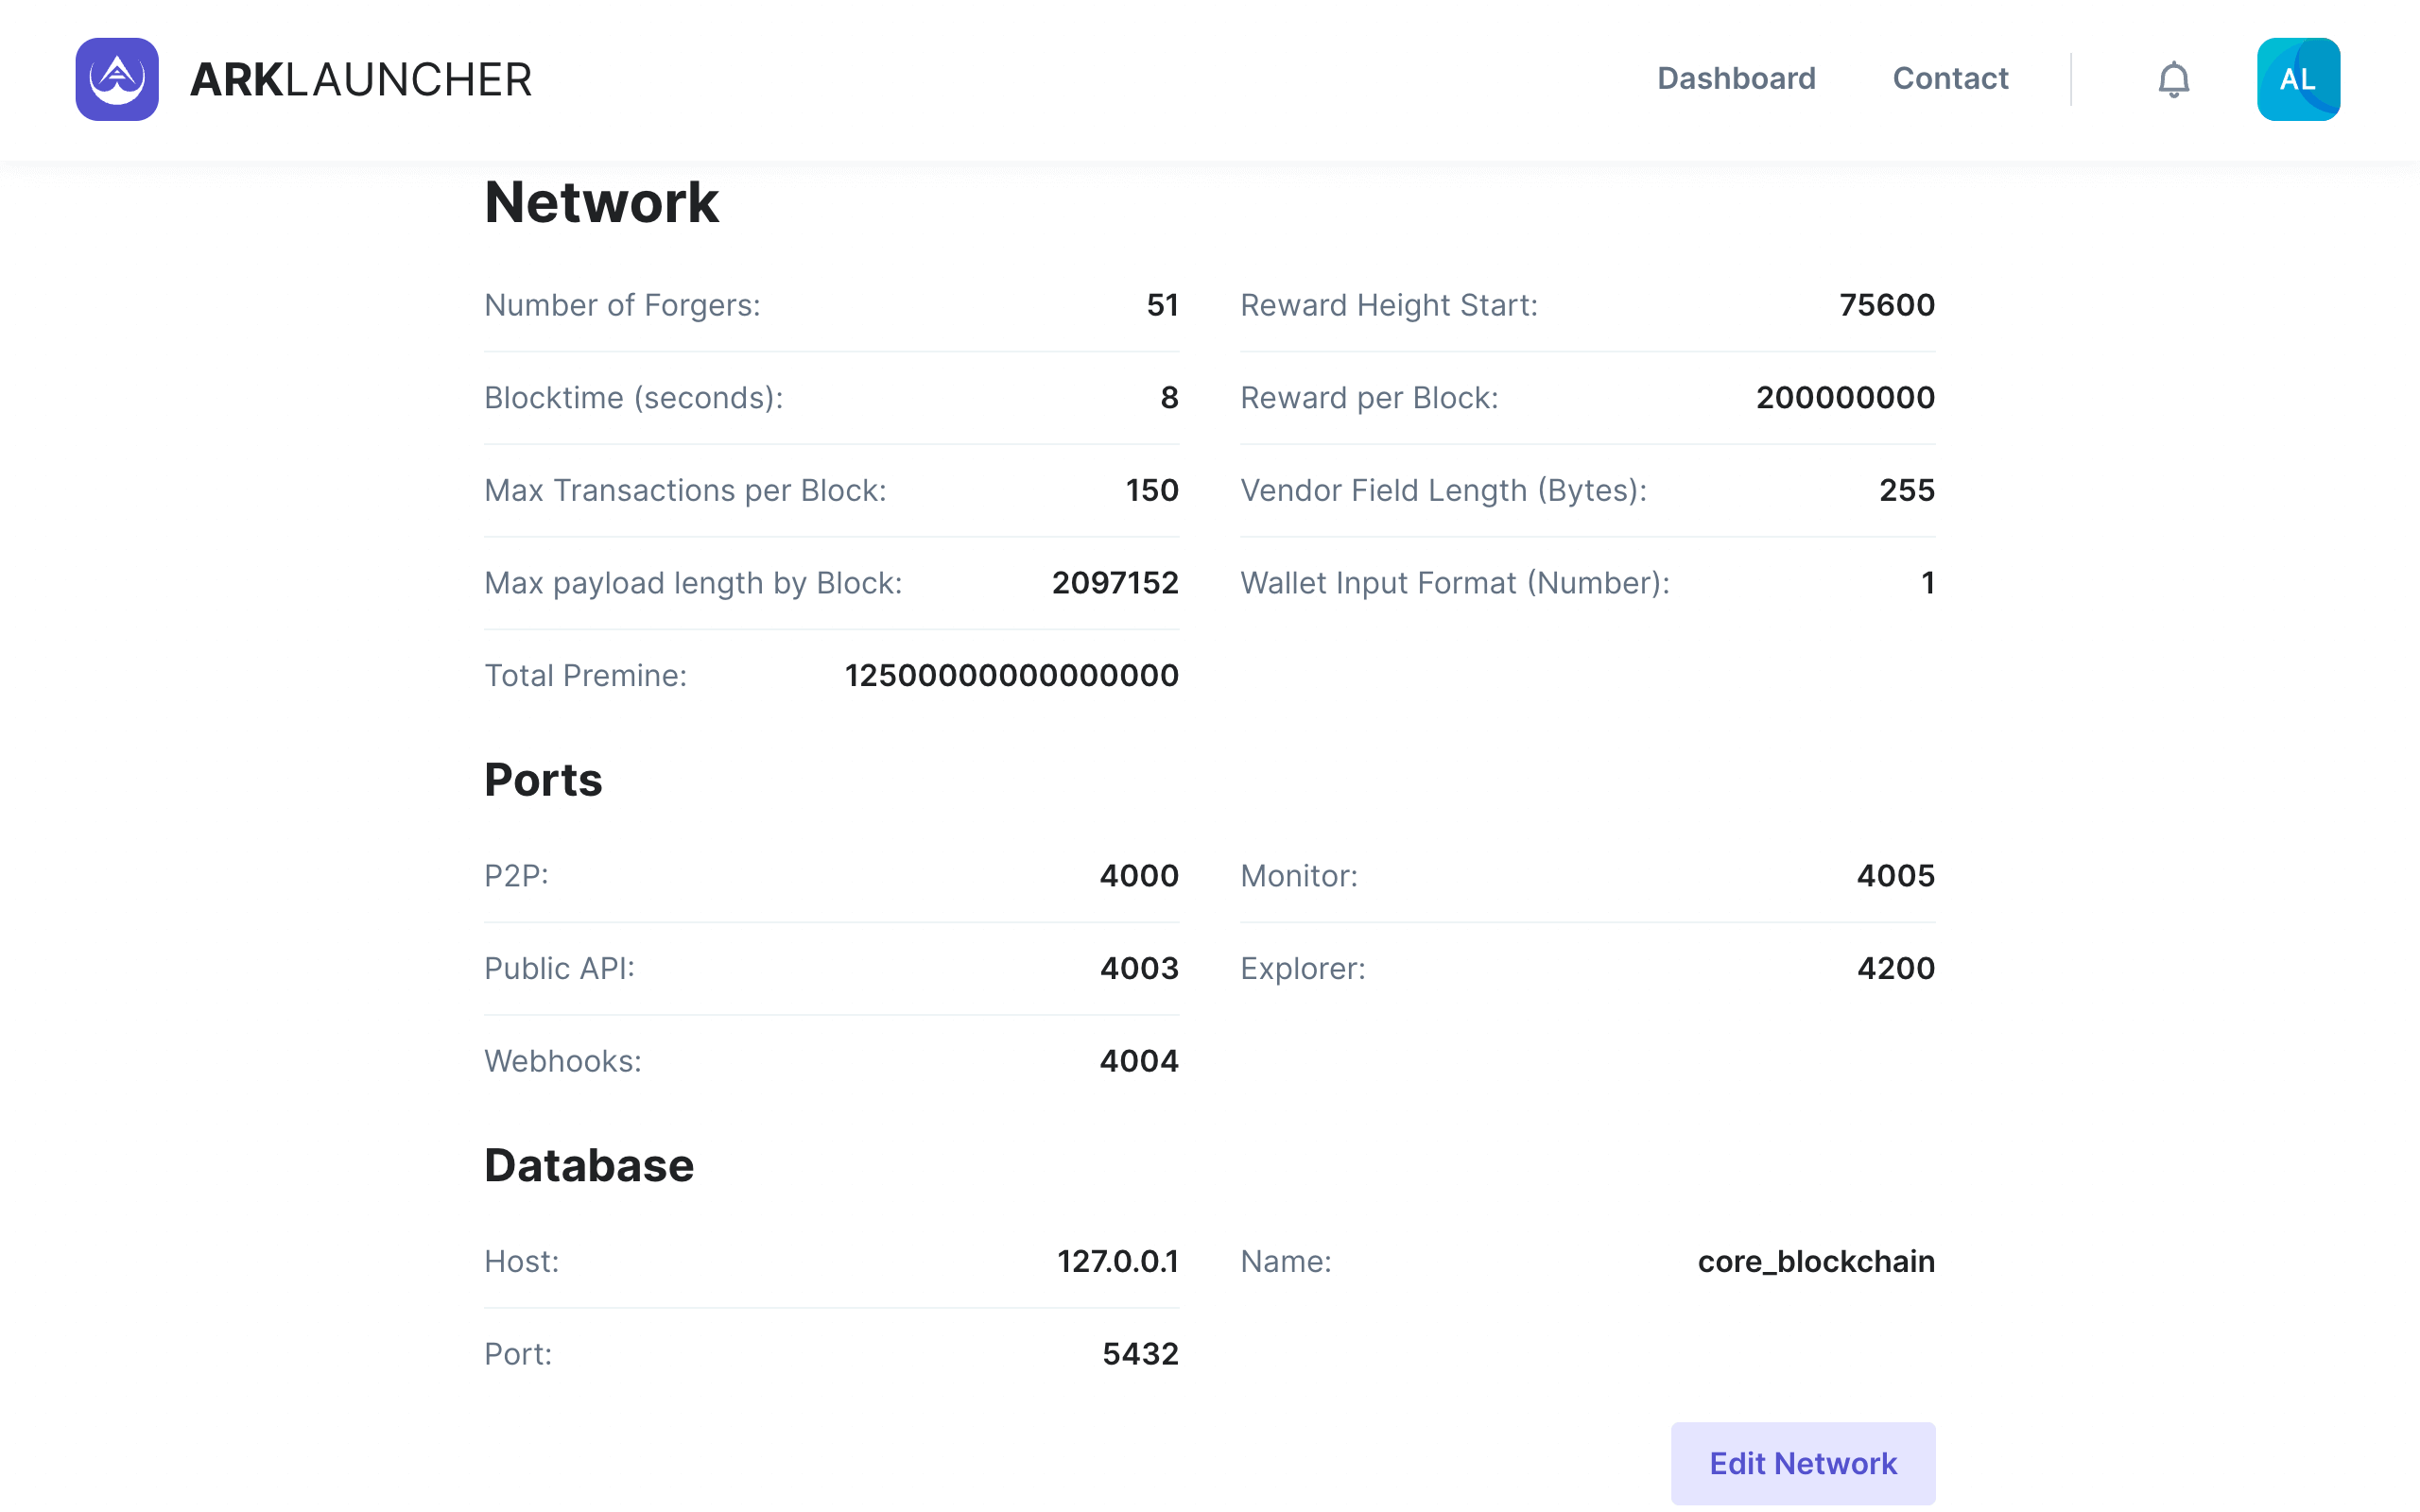
The Network section contains all the information and values for your network including number of forgers, blocktime, max transactions per block and so forth. You will also find your port numbers and database info under this section. If you wish to edit any of this information, click the Edit Network button located at the bottom right of this section.
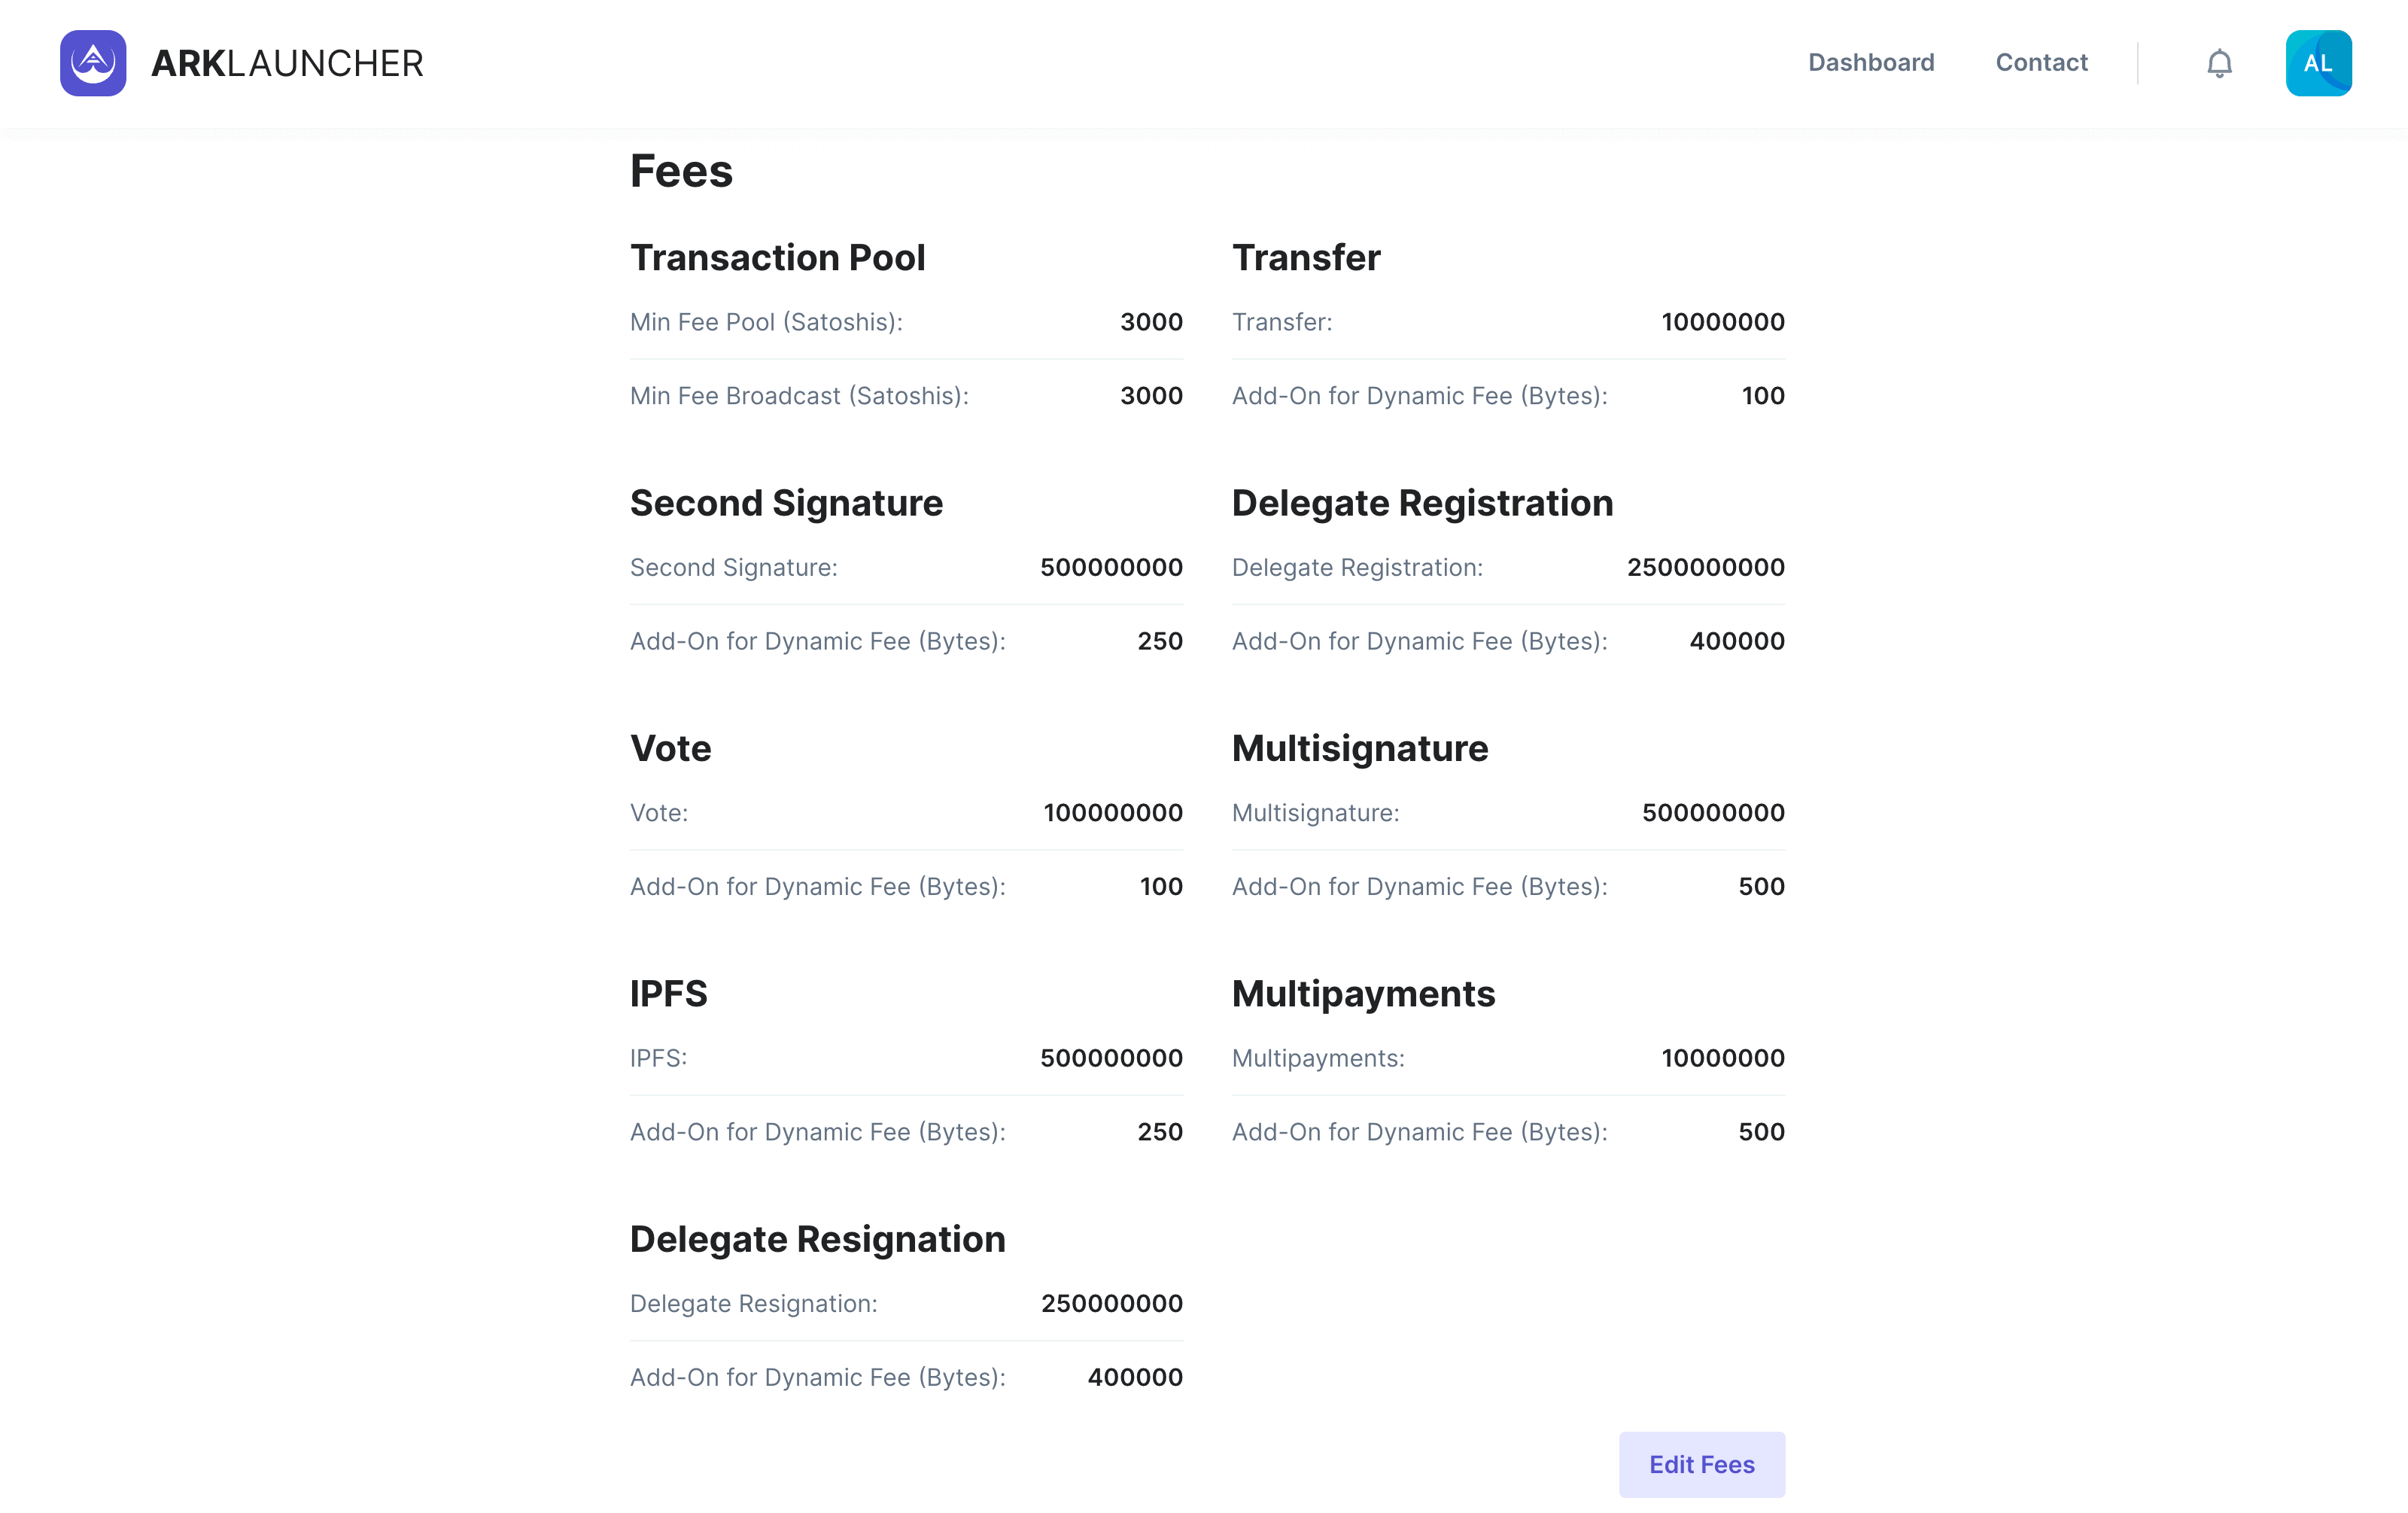
Finally the Fees section contains all the information and values pertaining to the various fees for your blockchain. Here you will find values for the transaction pool, transfer, second signature and so forth. If you wish to edit any of this information, click the Edit Fees button located at the bottom right of this section.
Upon reviewing all of the information and making any edits (if applicable), click the Save & Continue button to complete the customization process and move on to the next step.
Success
Having successfully completed the customization step, you may now move on to selecting a Server Provider.