Add Community Forgers and Delegates
This tutorial consists of three sections:
- How to Register a Delegate with ARKVault
- How to Install Core for Blockchain on a Clean Server
- How to Set Up a Forger on the Server
Prerequisites to continue with this tutorial include:
- Adding the Network to ARKVault
- Importing a Wallet or Creating a New Wallet
- Having enough funds in the wallet you wish to register a Delegate from to cover transaction fees (this depends on the network configuration which, by default, is set at 25 tokens)
- Obtain the Install Script for the Blockchain
- Prepared the server you wish to install the necessary blockchain software on
How to Register a Delegate with ARKVault
You will first need to register a Delegate if you wish to actively participate in the creation of new blocks and confirming transactions on the network. The role of Delegate carries with it great responsibility as you must commit resources and time towards securing the network.
Information
If you still need to import your wallet or generate a new one, please follow the following guide(s) on how to Import a Wallet or Generate a Wallet .
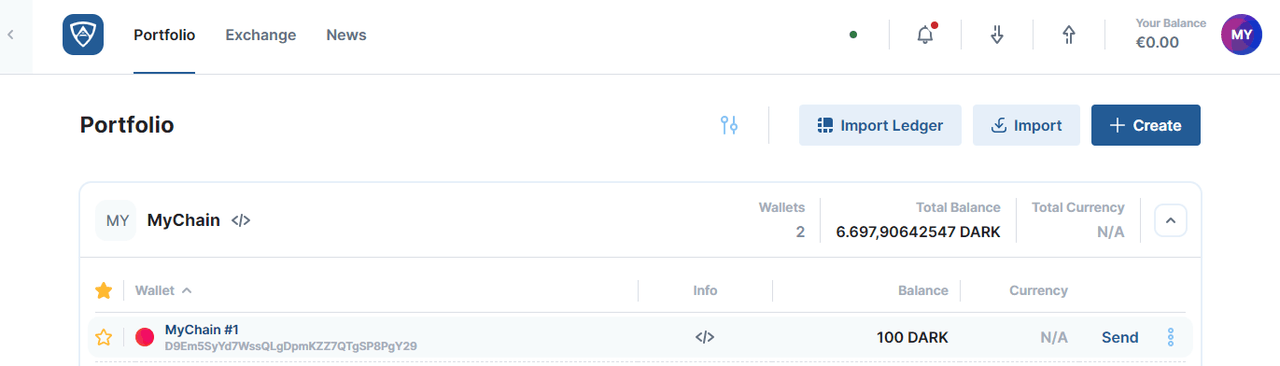
You will first need to access the wallet from which you wish to register a Delegate by clicking on it in the Portfolio Dashboard.
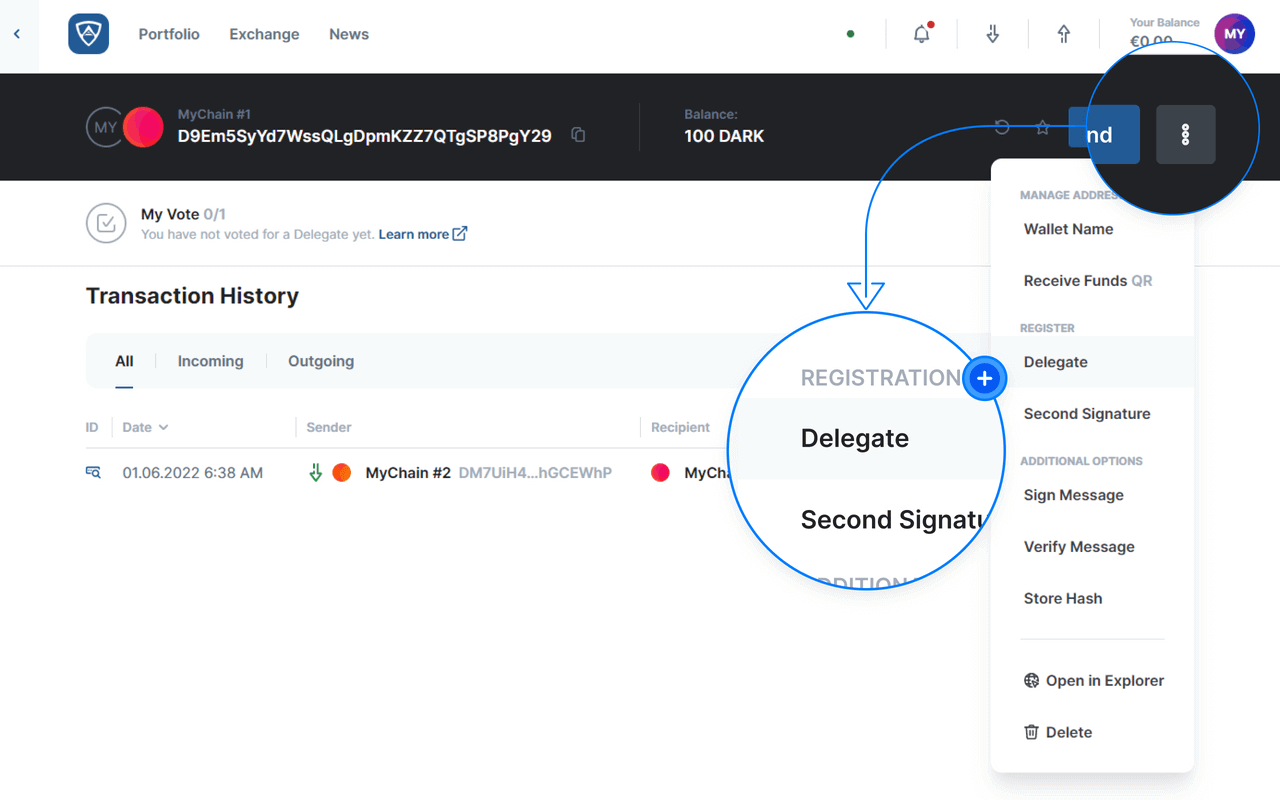
While viewing the wallet, click on the kebab menu (three dots) that appears to the right of the wallet and select Delegate from the dropdown menu.
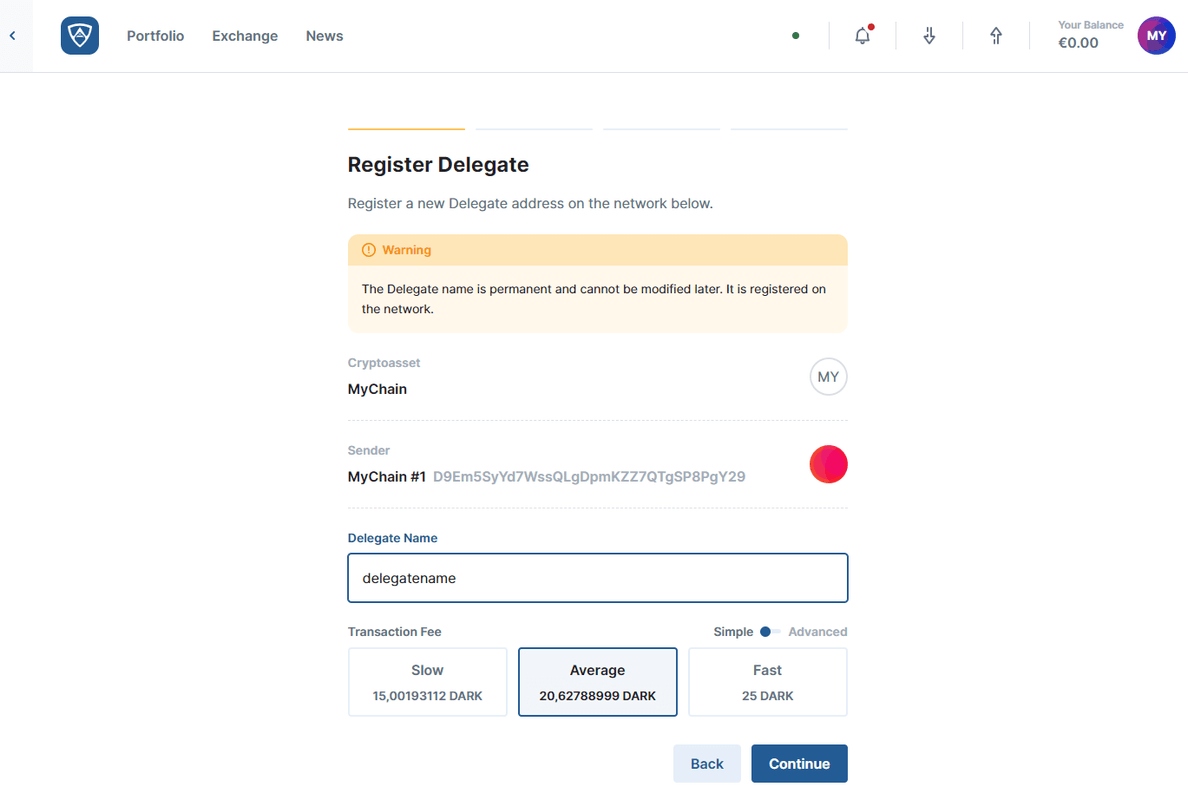
The Register Delegate page will appear. You will need to enter a name for your Delegate in the field provided and select a transaction fee. You may select a Slow, Average or Fast fee, or you switch to Advanced and input a custom fee if preferred. When ready, click the Continue button to proceed.
Information
You cannot change a Delegate name once you have registered it, so ensure that your name is appropriate and one you want to use for the foreseeable future. Also ensure that your wallet holds sufficient funds to cover the cost of the Delegate registration.
The Transaction Review page will then appear and allow you to review the details of the Delegate registration. When ready, click the Continue button to proceed further.
![]()
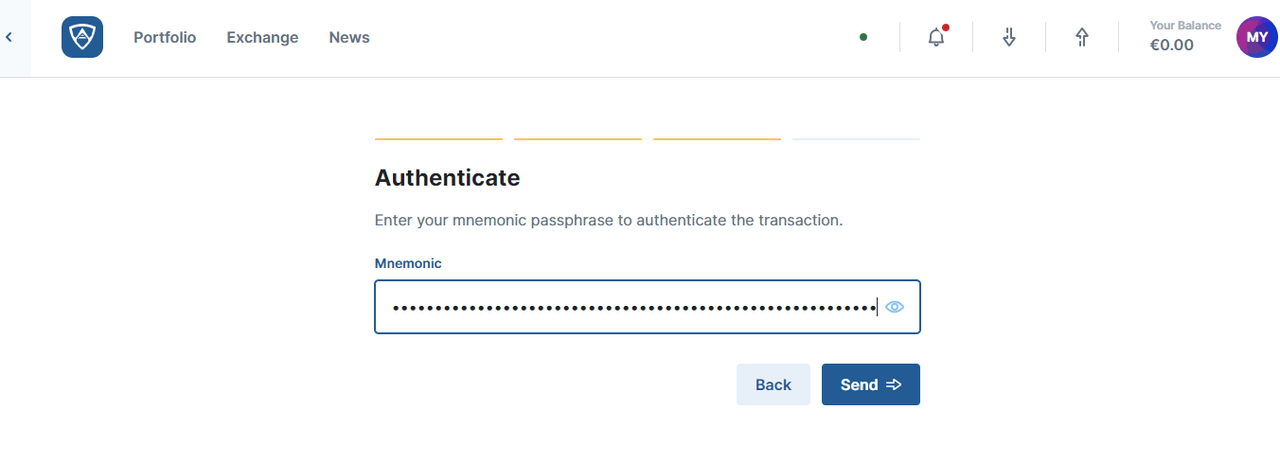
The Authenticate screen will prompt you to enter in your wallet’s credentials in order to authorize the transaction. Upon entering the necessary details, click the Send button to finalize the Delegate registration.
The Transaction Sent screen will then appear confirming that your Delegate registration completed successfully.
![]()
How to Install Core for Blockchain on a Clean Server
To begin the process, you will need to log in to the clean server upon which you wish to install Core software. The following information will guide you through the process of:
- Creating a new user account with the correct privileges
- Installing and configuring Core
- Initiatiating Relay and Forger instances, and
- Log the output using the provided installation script
Create a New Account
You will need to create a new dedicated user account to manage the necessary Core-related software. As an example, we will use sudo adduser delegate to create a user by the name of delegate, but you can choose another name if you prefer. On your server, enter the following into the command line:
1sudo adduser delegateA prompt will then ask you to create and confirm a new user password along with the user’s full name and some other information. When ready, type ‘y’ and press ‘Enter’ to finish.
1Adding user 'delegate' ... 2Adding new group 'delegate' (1000) ... 3Adding new user 'delegate' (1000) with group 'delegate' ... 4Creating home directory '/home/delegate' ... 5Copying files from '/etc/skel' ... 6Enter new UNIX password: 7Retype new UNIX password: 8passwd: password updated successfully 9Changing the user information for delegate10Enter the new value, or press ENTER for the default11 Full Name []:12 Room Number []:13 Work Phone []:14 Home Phone []:15 Other []:16Is the information correct? [y/n] yHelp
There is no need to fill in the above fields as each is optional, so you may leave them blank if preferred.
Grant Sudo Privileges
You will then need to ensure that your user account possesses all of the necessary privileges to run Core as required. The following command will give our user account sudo privileges. Run the command as illustrated:
1sudo usermod -a -G sudo delegateInformation
In the above example we use delegate for the name of the new user account, but you will need to substitute the name you chose for your user.
Log In as the New User
Switch to the user account created above - this will also land us in the user’s base directory (~/). Enter the following command into your terminal (replacing the username with your own if you chose a different one):
1sudo su - delegateDownload and Run the Installation Script
You will then need to download and execute the installation script. The script installs Core as well as all of its dependencies onto your server and publishes the configuration files for it. First ensure you navigate to the home directory of your server by entering:
1cdYou will then need to download the script itself. If you still require it, ensure that you request it from the owner of the blockchain. Download the script to your own server using the wget command along with the URL to the hosted install script:
1wget <URL-to-the-.zip-install>For example, if the script is hosted on GitHub, it would look similar to this:
1wget https://github.com/ardenthq/arklauncher/config-mychain-mainnet.zipInformation
If you the own the blockchain, you can follow this Installation Guide on how to obtain the script.
It is then necessary to unzip this file, but before doing so, you will need to install the relevant unzip package. You can do so by running the install command:
1sudo apt install unzipYou will then receive a request to input your user password to grant sudo privileges:
1[sudo] password for delegate: <your-password>It is now possible to unzip the file using the unzip command. Run it by entering:
1unzip <name-of-the-.zip-file>For example, you will enter a command that resembles the following:
1unzip config-mychain-mainnet.zipFinally you will need to run the installation script. Execute the following command and wait for the installation to complete:
1bash install.shWarning
The installation process may take some time to complete, so remain patient and allow everything to execute as required.
Configuring the Core Database
The last step of the required Core configuration is to set up the various database parameters. A prompt will appear - press ‘y’ and hitt the ‘Enter’ key to confirm:
1Would you like to configure the database? [y/n]:Input your preferred database credentials. This will effectively create a PostgreSQL role and database to be used for storing blockchain data:
1Enter the database username: mychain2Enter the database password: password3Enter the database name: <network_name> # your chosen network nameWarning
Replace <network_name> with the appropriate custom or predefined network name (for example, mychain_mainnet, mychain_devnet, or mychain_testnet).
Setting Your Own Command Line Execution Command
It is then necessary to configure the execute command for the Core software you just installed. This will allow the ticker name you set when you deployed your blockchain to execute each Core command you run. Enter the following command:
1source .bashrcThis will link your blockchain ticker to the CLI of Core. You can view all available commands by running:
1<ticker> helpIn our example we set the ticker as myn, so in this case, each Core command will start with myn:
1myn helpStarting a Relay Process
The next step entails synching your server up with your blockchain network. You can do so by running:
1<ticker> relay:startFor example, in our case, this would appear as follows:
1myn relay:startYou can log its output by entering the following command into your terminal:
1pm2 logsFor testing you can also use the --seed flag to start the relay process if an insufficient number of peers currently exist on the network (so for example, running it as <ticker> relay:start --seed). For normal use, you can check the current number of peers in the peers.json file located in the .config/<ticker>-core/<network>/peers.json.
Configuring a Forger
To begin, run the configuration wizard for forger:
1<ticker> config:forgerFor example, in our case, this will appear as follows:
1myn config:forgerThis brings up an interactive menu where you must choose from one of two options in order to set up your Forger passphrase (either Encrypted BIP38 or Plain BIP39).
Choose your preferred method using the ‘Up’ and ‘Down’ arrow keys and confirm your selection by hitting the ‘Enter’ key.
1✔ Please select how you wish to store your delegate passphrase? > - Use arrow-keys. Return to submit.2 3> Encrypted BIP38 (Recommended)4 Plain BIP39Information
When entering a BIP39 passphrase (which consists of either 12 or 24 words), ensure you either paste it directly from the file itself or type it out as displayed when you generated it (using all lower case letters with words separated by spaces and no space at the end).
-
Encrypted BIP38 encrypts your BIP39 passphrase with your custom password and saves the encrypted passphrase. In order to decrypt it, you will need to provide your set password, so take care to back it up as well. Once all of this is set up, you will need to confirm your input with the ‘y’ and ‘Enter’ keys.
-
Plain BIP39 will save your mnemonic passphrase in plain text. Once this is complete, you will need to confirm your input with the ‘y’ and Enter’ keys.
Warning
Do not share login details with unauthorized individuals - BIP38 encryption offers additional protection but does not prevent the malicious extraction of a BIP39 mnemonic by those with access to your server.
BIP-38 Setup (Recommended)
An example of setting up an Encrypted BIP38 passphrase appears as follows:
1<ticker> config:forger 2 3✔ Please select how you wish to store your delegate passphrase? > - Use arrow-keys. Return to submit. 4 5> Encrypted BIP38 (Recommended) 6 Plain BIP39 7 8✔ Please enter your delegate plain text passphrase. Referred to as BIP39. 9 10✔ Please enter your custom password that encrypts the BIP39. Referred to as BIP38.11 12✔ Confirm custom password that encrypts the BIP39. Referred to as BIP38.13 14 ✔ Validating passphrase is BIP39 compliant.15 ✔ Prepare crypto.16 ✔ Loading private key.17 ✔ Encrypting BIP39 passphrase.BIP-39 Setup
An example of setting up a Plain BIP39 passphrase appears as follows:
1<ticker> config:forger 2 3✔ Please select how you wish to store your delegate passphrase? > - Use arrow-keys. Return to submit. 4 5 Encrypted BIP38 (Recommended) 6> Plain BIP39 7 8✔ Please enter your delegate plain text passphrase. Referred to as BIP39. 9 10✔ Can you confirm? > (y/n)11 12 ✔ Validating passphrase is BIP39 compliant.13 ✔ Writing BIP39 passphrase to configuration.Whether encrypted or not, your passphrase is saved in the delegates.json file located in .config/<ticker>-core/<network>/delegates.json. You will replace mainnet, devnet or testnet depending on the network you operate on (Production for mainnet, Development for devnet and Test for testnet).
Starting the Forger Process
Once everything is set up, you will need to start the Forger process by executing:
1<ticker> forger:startWhen the process initializes, you will receive the following message:
1Starting <ticker>-forger... doneThis will initiate and read your passphrase and then start the Forger process. You can check your Forger logs by entering:
1<ticker> forger:logFinalize the Setup
If installed and executed as required, after your node fully synchs, you should receive an output similar to this (with your own Delegate name and your Delegate’s associated public key of course):
12|myn-forger | [2019-03-20 12:12:36][DEBUG]: Loaded 1 delegate: undefined (02297e602dcb3e6ee81205e9e0a7754d50cf3791b06b01fb6e9dde17059b1fb1ba)22|myn-forger | [2019-03-20 12:12:36][INFO]: Forger Manager started with 1 forgerSuccess
Having completed all the necessary steps and successfully set up a Relay as well as Forger processes, you may begin securing the network and producing new blocks.